|
|
|
Experiment 1 – OS Installation for server configuration
*Experiment 2 – Configuring TCP/IP
*Experiment 3 – Network Storage Sharing
*Experiment 4 – Configuring SAMBA to share resources
*Experiment 5 – Configuring DNS Server
*Experiment 6 – Configuring Mail Server
*Experiment 7 – Configuring Web Server
*Experiment 8 – Configuring FTP Server
*
Appendix 1
*RedHat Linux Installation
*Appendix 2
*Windows NT Server Installation
*Appendix 3
*Configuring TCP/IP
*Appendix 4
*TCP/IP Utilities
*Appendix 5
*The Network File System (NFS)
*Appendix 6
*NT File Sharing
*Appendix 7
*SAMBA
*Appendix 8
*Linux DNS Configuration:
*Appendix 9
*Windows NT Server DNS Configuration
*Appendix 10
*Configuring Sendmail
*Appendix 11
*Configuring Microsoft Exchange Server
*Appendix 12
*Configuring Apache Web Server
*Appendix 13
*Configuring IIS 4
*Appendix 14
*Configuring ftp Server
*Experiment 1 – OS Installation for server configuration
Objective:
Procedure:
Practical Assignment:
Submit a single page report on the similarity and difference between the two Oses.
Guide: take note on the file system, ip assigning, system structure, security……
References:
Appendix 1 and Appendix 2.
Experiment 2 – Configuring TCP/IP
Objective:
In order for your machine to communicate with other machine, TCP/IP should be setup. In this experiment, we are going to look at the process, setting up the support files, TCP/IP route files and how to setup your system to act as a gateway between networks, or use other machine as a gateway.
Procedure:
Can it be done? Why?
route add –net 192.168.0.0 netmask 255.255.255.0 eth0 or
route add –net 192.168.1.0 netmask 255.255.255.0 eth0
route del –net 192.168.0.0 netmask 255.255.255.0 eth0 or
route del –net 192.168.1.0 netmask 255.255.255.0 eth0
route add –net 192.168.0.0 mask 255.255.255.0 gw
Practical Assignment:
Submit your observation during the experiment.
References:
Appendix 3 & Appendix 4
Experiment 3 – Network Storage Sharing
Objective:
Procedure: (Linux)
If these daemons haven’t start, execute it in /usr/sbin
# /etc/export
/usr/local/data user1 (rw) user2 (rw)
/usr/ftp (ro)
mount –t nfs remote_dir local_dir [-o option]
Procedure: (Windows NT)
References:
Appendix 5 & Appendix 6
Experiment 4 – Configuring SAMBA to share resources
Objective
SAMBA is an open source that supports resources sharing between different OS platform. In this experiment, we are going to configure the SAMBA server so that we can locate a Linux drive in NT environment and vice versa.
Procedure
Reference:
Appendix 7
Experiment 5 – Configuring DNS Server
Objective:
In this experiment, we are going to setup our own domain name server so that, we can refer our server by name and we are going to look into how DNS integrate with some other Internet services. After this experiment you should be able to build data file for DNS, how to setup DNS Server/client and how to test the setup.
Procedure:
Practical Assignment:
References:
Appendix 8 & Appendix 9
Experiment 6 – Configuring Mail Server
Objective:
This lab simulates sending and receiving e-mail across the internet. Because the classroom is a TCP/IP-based network just like the internet, the only real difference is that the messages do not go through multiple routers as they would on the internet.
Procedure:
Practical Assignment:
Try send an email out by telnet into your smtp server.
Hints:
Look for the SMTP RFC.
References:
Appendix 10 and Appendix 11
Experiment 7 – Configuring Web Server
Objective:
This experiment simulate accessing the web page from the internet by using Apache web server in Linux and IIS Server in NT.
In this experiment, we are going to setup the server to serve as a multi-hosting server.
Procedure:
Practical Assignment:
Create your own web page and host it in your own web server. Assessment is base on the functionality of the web pages. You can use any third party software (i.e. Dreamweaver, Frontpage, etc…), language (javascript, vb script, cgi, perl …) to create your own web page.
References:
Appendix 12 & Appendix 13
Experiment 8 – Configuring FTP Server
Objective:
This experiment simulates accessing the FTP site from the Internet. Upon completion of this practical, you will be able to set up an anonymous FTP server and a FTP server.
Procedure:
Practical Assignment:
Try to list the content of the ftp server by telnet into ftp server. Submit a report on this. Assessment is base on the functionality that telnet can do. e.g. download file, upload file, etc.
Hint:
Refer to FTP RFC.
References:
Appendix 13 & Appendix 14
All Linux distribution nowadays come with bootable CDROM. So installation of Linux was a simple task. When the installation program boot up, it will probe your system and attempt to identify your CD-ROM drive.
After booting, the installation program begins by displaying the language screen. If you wish to abort the installation process at this time, simply eject the boot diskette or CD-ROM now and reboot your machine.
Selecting a Language
Using your mouse, you can select your preferred language to use for the installation and the system default

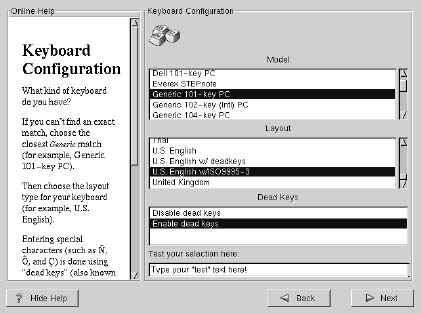
Selecting Keyboard Type
First, choose the model that best fits your system. Next, choose the correct layout type for your keyboard (for example, U.S. English).
If you wish to change your keyboard type after you have installed your Red Hat Linux system, you can use the /usr/sbin/kbdconfig command or you can type setup at the root prompt.
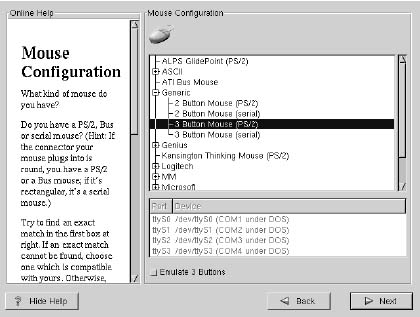
Selecting the mouse
First, choose the correct mouse type for your system. Try to find an exact match. If an exact match cannot be found, choose a mouse type that you are sure is compatible with your system
If you have a PS/2 or a Bus mouse, you do not need to pick a port and device. If you have a serial mouse, you should choose the correct port and device that your serial mouse is on.
The Emulate 3 Buttons check box allows you to use a two-button mouse as if it had three buttons. In general, it’s easiest to use the XWindowSystem if you have a three-button mouse. If you select this check box, you can emulate a third, "middle" button by pressing both mouse buttons simultaneously.
If you wish to change your mouse configuration after you have booted your Red Hat Linux system, you can use the /usr/sbin/mouseconfig command from the shell prompt.
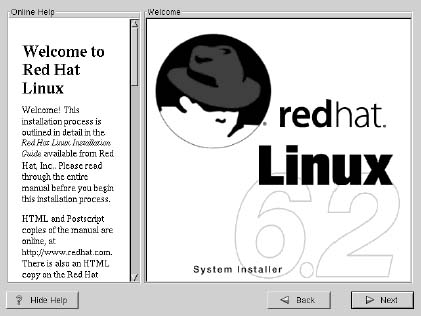
Welcome Screen
After all, you will see a welcome screen. Now, the hardware are set. So lets the software begin.
Types of Installation
This section will let you choose what type of installation method you want. You can perform a full installation or an upgrade. If you choose to perform a full installation, you must also choose the class of the installation. Your options include: Custom, GNOME Workstation, KDE Workstation or Server.
Only the custom-class installation allows you complete flexibility. The workstation-class and server-class installations automatically go through the installation process for you and omit certain steps. During a custom-class installation, it is up to you how disk space should be partitioned. You have complete control over the packages that will be installed on your system. You can also determine whether you’ll use LILO to boot your system.
The installation process for Red Hat Linux 6.2 includes the ability to upgrade from prior versions of Red Hat Linux (version 2.0 and later) that are based on RPM technology.
Upgrading your system installs the modular 2.2.x kernel as well as updated versions of the packages, which are currently installed on your machine.

Partitioning with FDISK

Once you have chosen which drive to partition, you will be presented with the fdisk command screen: as shown…
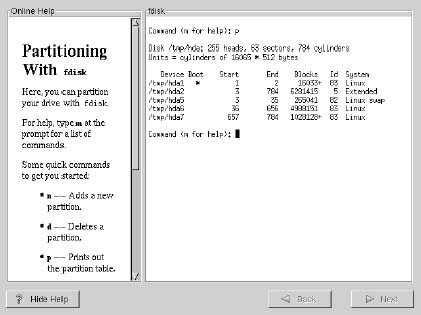
Some useful fdisk command:
m: list the available help
n: make new partition
-- p: create a primary partition
-- e: create an extended partition
-- l: create a logical partition under the extended partition
p: print the current partition table
t: change the partition tag-type (linux native, linux swap, …)
w: write the partition table to the hard disk
After you have partitioned your drive(s), click Next. You will then use Disk Druid to assign mount points to your partitions. You will not be able to add new partitions using Disk Druid, but you will be able to edit those you have already created.

Some Terminology of Disk Druid
Mount Point: This field indicates where the partition will be mounted. If a partition exists, but is "not set" you need to define its mount point. Double-click on the partition or use the Edit key.
Device: This field displays the partition’s device name.
Requested: The "Requested" field shows the partition’s original size. To re-define the size, you must delete the current partition and recreate it using FDISK.
Actual: The "Actual" field shows the space currently allocated to the partition.
Type: This field shows the partition’s type (such as Linux Native or DOS).
Choose Partition to format

Installing/ Configuring LILO
In order to be able to boot your Red Hat Linux system, you usually need to install LILO (the LInux LOader). You may install LILO in one of two places:
The master boot record (MBR)
The recommended place to install LILO, unless the MBR already starts another operating system loader, such System Commander or OS/2’s Boot Manager. The master boot record is a special area on your hard drive that is automatically loaded by your computer’s BIOS, and is the earliest point at which LILO can take control of the boot process. If you install LILO in the MBR, when your machine boots, LILO will present a boot: prompt. You can then boot Red Hat Linux or any other operating system you configure LILO to boot.
The first sector of your root partition
Recommended if you are already using another boot loader on your system (such as
OS/2’s Boot Manager). In this case, your other boot loader will take control first. You can then configure that boot loader to start LILO (which will then boot Red Hat Linux).
Note: If you have Windows NT (and you want to install LILO) you should choose to install LILO on the first sector of the root partition, not the MBR.
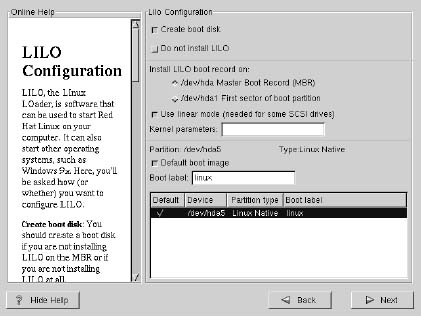
Create boot disk -- The Create boot disk option is checked by default. If you do not want to create a boot disk, you should deselect this option.
A boot disk can be handy for a number of reasons:
Do not install LILO -- if you have Windows NT installed on your system, you may not want to install LILO. If you choose not to install LILO for this reason, make sure that you have chosen to create a boot disk; otherwise you will not be able to boot Linux. You can also choose to skip LILO if you do not want to write LILO to your hard drive.
Network Configuration
The network configuration in Red Hat Linux is simple. You can choose your device type and whether you would like to configure the device using DHCP or manually. If you have multiple ethernet devices, each device will keep the information you have provided. You may switch between devices, for example eth0 and eth1, and the information you give will be specific to each device. If you select Activate on boot, your network interface will be started when you boot.

Next enter, where applicable, the IP Address, Netmask, Network, and Broadcast numbers.
Take this opportunity to enter in a name for your system. If you do not, your system will be known as localhost.
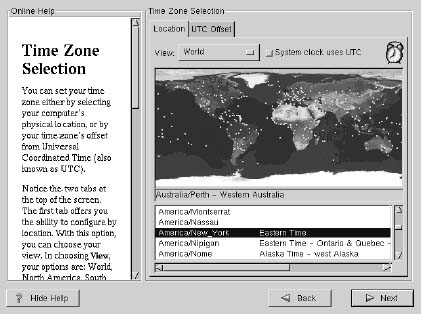
Time Zone Configuration
You can set your time zone either by selecting your computer’s physical location, or by your time zone’s offset from Universal Coordinated Time (also known as UTC).
This session let you to enter the root password for the system and create user account to login the system.

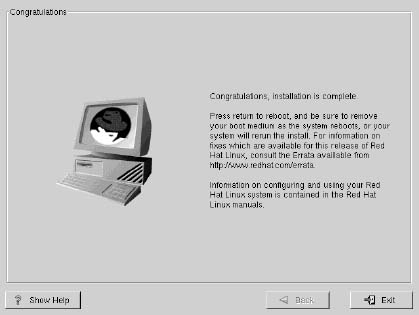
Post-configuration
After all these basic configuration, the system was basically being setup, and the installation of packages will begin. After all the selected package had been installed, the system have to be reboot. And the system is ready to run.


Windows NT Server Installation
When you insert the Windows NT CD ROM, it will automatically bring up the setup window. If you don't see this, double click on the CD ROM.
Press the Windows NT Setup button.
You must confirm the location of your Windows NT setup files.
Press Enter to continue.
Setup will take quite a while to copy files to your hard disk (Ten minutes or more). Once it is complete, press enter to leave setup and then restart your computer.
When the computer restarts, you will be in a dual-boot configuration and it will allow you to select which system to start. Use the arrow keys to select Windows NT 4.0 Installation/Upgrade.
The setup process will continue and you will be asked to confirm a number of hardware-related settings.
After all the options are set, Windows NT setup will finish copying files and restart again.
When the computer restarts, you will again be allowed to select which system to start. Use the arrow keys to select Windows NT Server Version 4.0
You will be placed in Windows NT Setup and asked to finish setting up the remainder of the Windows NT configuration.
Part One
is information about your computer.Part Two
is information about your network.Part Three
is the configuration of your computer.
Finally, setup will copy more files, complete the configuration, and ask you to restart your computer.
The first step in setting up TCP/IP on your Linux machine is to make the network interface accessible. This is done with the ifconfig command. When run, ifconfig essentially makes the network layer of the kernel work with the network interface by giving it an IP address, and then issuing the command to make the interface active. When the interface is active, the kernel can send and receive data through the interface.
You need to set up several interfaces for your machine, including the loopback driver and the Ethernet interface (or whatever other network interface you are using). The ifconfig command is used for each interface in turn. The general format of the ifconfig command is
ifconfig interface_type IP_Address
where interface_type is the interface's device driver name, such as lo for loopback, ppp for PPP, and eth for Ethernet. The IP_Address is the IP address used by that interface.
Once the ifconfig command has been run and the interface is active, you must use the route command to add or remove routes in the kernel's routing table. This is needed to allow the local machine to find other machines. The general format of the route command is:
route add|del IP_Address
where either add or del is specified to add or remove the route from the kernel's routing table, and IP_Address is the remote route being affected.
You can display the current contents of the kernel's routing table at any time by entering the command route all by itself on the command line. For example, if your system is set up only with the loopback driver, you will see an output like this:
$ route

Kernel Routing Table

Destination Gateway Genmask Flags MSS Window Use Iface

loopback * 255.0.0.0 U 1936 0 16 lo
The important columns are the destination name, which shows the name of the configured target (in this case only loopback), the mask to be used (Genmask), and the interface (Iface, in this case /dev/lo). You can force route to display the IP addresses instead of symbolic names by using the -n option:
$ route -n
Kernel Routing Table
Destination Gateway Genmask Flags MSS Window Use Iface
127.0.0.1 * 255.0.0.0 U 1936 0 16 lo
A typical Linux network configuration will include a couple of interfaces. The loopback interface should exist on every machine. The network interface, whether Ethernet or other device, is also present (unless you only want a loopback driver). This chapter assumes you want to set up your system for a loopback and an Ethernet card, both of which need to be done separately.
Setting Up the Loopback Interface
The loopback interface should exist on every networked machine (as well as machines that are stand-alone, for that matter). The loopback interface always has the IP address 127.0.0.1, so the /etc/hosts file should have an entry for this interface. The loopback driver may have been created by the kernel during software installation, so check the /etc/hosts file for a line similar to this:
127.0.0.1 localhost
If the line exists, the loopback driver is in place. Make sure the line doesn't have a pound sign ahead of it to comment it out. If the line doesn't exist in the /etc/hosts file, add it using an ASCII editor.
If the loopback interface was not in the /etc/hosts file, you will need to create the interface as well using the ifconfig command. Issue the following command to complete the addition of the loopback driver:
ifconfig lo 127.0.0.1
If you are not sure about the configuration, you can use the ifconfig command to display all the information it knows about the loopback driver. Use the following command:
ifconfig lo
You should see several lines of information like the following:
merlin:~# ifconfig lo
lo Link encap:Local Loopback
 inet addr:127.0.0.1 Bcast:127.255.255.255 Mask:255.0.0.0
 UP BROADCAST LOOPBACK RUNNING MTU:2000 Metric:1
 RX packets:0 errors:0 dropped:0 overruns:0
 TX packets:12 errors:0 dropped:0 overruns:0
If you get an error message such as unknown interface, the loopback driver does not exist and must be added.
Once the ifconfig routine has been checked, add the loopback driver to the kernel routing tables with one of these two commands:
	route add 127.0.0.1
	route add localhost
It doesn't matter which command you use because they both refer to the same thing. The command essentially tells the kernel that it can use the route for address 127.0.0.1 or the name localhost.
As a quick check that all is correct with the loopback driver, you can use the ping command to check the routing. For example, if you issue either of these two commands
	ping localhost
	ping 127.0.0.1
you should see output like this:
PING localhost: 56 data bytes
64 bytes from 127.0.0.1: icmp_seq=0. ttl=255 time=1 ms
64 bytes from 127.0.0.1: icmp_seq=1. ttl=255 time=1 ms
64 bytes from 127.0.0.1: icmp_seq=2. ttl=255 time=1 ms
64 bytes from 127.0.0.1: icmp_seq=3. ttl=255 time=1 ms
^C
--- localhost PING Statistics ---
4 packets transmitted, 4 packets received, 0% packet loss
round-trip (ms) min/avg/max = 1/1/1
The ping command's progress was interrupted by the user issuing a Ctrl-C after seven transmissions. You can let as many transmissions as you want go by. If you get a "no replies" from the ping command, then the address 127.0.0.1 or the name localhost wasn't recognized and you should check the configuration files and route entry again.
If the configuration files look correct and the route command was accepted properly, but the ping command still doesn't produce the proper results, then you have a serious problem. In some cases, the network kernel is not properly configured and the entire process must be conducted again. Sometimes a mismatch in versions of kernel drivers and network utilities can cause hang-ups with the ping routine, as well.
Setting Up an Ethernet Interface
Now that the loopback driver is installed and operational, you can do the same configuration process with the Ethernet driver (or whatever driver you are using). The process is exactly the same: use ifconfig to tell the kernel about the interface, and then add the routes to the remote machines on the network. If the network is attached, you can then test the connections with ping.
To begin, set up the Ethernet interface using ifconfig. To make the interface active, use the ifconfig command with the Ethernet device name and your local IP address. For example, use the command
ifconfig eth0 147.123.20.1
to set up the local machine with the IP Address 147.123.20.1. The interface is to the Ethernet device /dev/eth0. You don't have to specify the network mask with the ifconfig command, because it will deduce the proper value from the IP address entered. If you want to explicitly provide the network mask value, append it to the command line with the keyword netmask:
ifconfig eth0 147.123.20.1 netmask 255.255.255.0
This command explicitly sets the network mask to 255.255.255.0. You can then check the interface with the ifconfig command using the interface name:
$ ifconfig eth0 eth0 Link encap 10Mps: Ethernet Hwaddr inet addr 147.123.20.1 Bcast 147.123.1.255 Mask 255.255.255.0 UP BROADCAST RUNNING MTU 1500 Metric 1 RX packets:0 errors:0 dropped:0 overruns:0 TX packets:0 errors:0 dropped:0 overruns:0
You may have noticed in the output from the command that the broadcast address was set based on the local machine's IP address. This is used by TCP/IP to access all machines on the local area network at once. The Message Transfer Unit (MTU) size is usually set to the maximum value of 1500 (for Ethernet networks).
Next, you need to add an entry to the kernel routing tables that let the kernel know about the local machine's network address. That lets it send data to other machines on the same network. The IP address that is used with the route command to do this is not your local machine's IP address, but that of the network as a whole without the local identifier. To set the entire local area network at once, the -net option of the route command is used. In the case of the IP addresses shown previously, the command would be:
route add -net 147.123.20.0
This command adds all the machines on the network identified by the network address 147.123.20 to the kernel's list of accessible machines. If you didn't do it this way, you would have to manually enter the IP address of each machine on the network. An alternative method is to use the /etc/networks file which can contain a list of network names and their IP addresses. If you have an entry in the /etc/networks file for a network called foobar_net, you could add the entire network to the routing table with the command:
route add foobar_net
Once the route has been added to the kernel routing tables, you can try the Ethernet interface out. This step assumes, of course, that you are connected to other machines and that you know the IP address of one of them. If your network isn't installed yet or you are not connected to another machine that is running TCP/IP, you can't try this step now. To ping another machine, you need either its IP address or its local name. Suppose you know the IP address and want to ping the machine 142.12.130.12. The command and output looks like the following:
tpci_sco1-45> ping 142.12.130.12 PING 142.12.130.12: 64 data bytes 64 bytes from 142.12.130.12: icmp_seq=0. time=20. ms 64 bytes from 142.12.130.12: icmp_seq=1. time=10. ms 64 bytes from 142.12.130.12: icmp_seq=5. time=10. ms 64 bytes from 142.12.130.12: icmp_seq=6. time=10. ms ^C --- 142.12.130.12 PING Statistics --- 4 packets transmitted, 4 packets received, 0% packet loss round-trip (ms) min/avg/max = 10/12/20
Again, the ping routine was interrupted after four attempts. You can see the diagnostic messages and summaries as ping sends a request to the remote machine and waits for a reply.
If you don't get anything back from the remote machine, verify that the remote is connected and you are using the proper IP address. If all is well there, check the configuration and route commands. If that checks out, try pinging another machine. If that fails, you can resort to the netstat utility, discussed in more detail in, "Network Utilities."
Gateways
Local area networks are connected by a gateway. The gateway is one machine that acts as the connection between the two networks, routing data between the two based on the IP address of the destination machine. The simplest use of a gateway is to connect to the rest of the world through the Internet. A machine that connects into the Internet can then connect to any other network on the Internet.
You have to make some changes to the network configuration files whenever your local machine is going to use a gateway, as well as if your machine is going to act as a gateway. To use the services of another machine as a gateway, you have to tell the routing tables about the gateway and the networks it connects to by using the route command
route add default gw net_gate
where net_gate is the name of the machine on your local area network that acts as the gateway out. The gateway machine follows the keyword gw in the route command. The use of the word default in the command indicates that the kernel's routing table should assume all networks can be reached through that gateway. (Physically, the default network setting translates to an IP address of 0.0.0.0.)
If you want to configure a gateway to another network, the name of that network should be in the /etc/networks file (see earlier in this chapter for details of the /etc/networks file). For example, if you have a gateway machine called gate_serv that leads from your own local area network to a neighboring network called big_corp (and an entry exists in the /etc/networks file for big_corp with their network IP address), you could configure the routing tables on your local machine to use gate_serv to access big_corp machines with this command:
route add big_corp gw gate_serv
An entry should be made on the remote network's routing table to reflect your network's address, otherwise you would only be able to send data and not receive it.
If you want to set up your local machine to act as a gateway itself, you need to configure the two network connections that your machine is joining. This usually requires two network boards, PPP connections, or SLIP connections in some combination. Assume your machine is going to act as a simple gateway between two networks called small_net and big_net, and you have two Ethernet cards installed in your machine. You configure both Ethernet interfaces separately with their respective network IP addresses, (For example, your machine many have an IP address on big_net of 163.12.34.36 and have the IP address 147.123.12.1 on small_net.)
Add the two IP addresses to your /etc/hosts file to simplify resolution. For the networks and IP addresses mentioned previously, you will have the following two entries in the /etc/hosts file:
	163.12.34.36 merlin.big_net.com merlin-iface1
	147.123.12.1 merlin.small_net.com merlin-iface
In this case, the fully qualified domain names have been added to the /etc/hosts file (this example assumes the machine has the name merlin on both networks, which is perfectly legal). You can also add shorter forms of the name, as well (such as merlin, merlin.big_net, and so on). Finally, the interface names have been included for convenience (so merlin-iface1 is the first interface on merlin, while merlin-iface2 is the second).
You then use the ifconfig commands to set up the connections between the interface and the names used in the /etc/hosts file:
ifconfig eth0 merlin-iface1 ifconfig eth1 merlin-iface2
These commands assume that the Ethernet device /dev/eth0 is for the interface to big_net, and /dev/eth1 is for small_net. Of course, you could have used the IP addresses of the networks instead of the interface name, as you saw earlier in this chapter.
Finally, the kernel routing table must be updated to reflect the two network names. The commands for this example are:
	route add big_net
	route add small_net
When these steps are completed, you must make sure that IP Forwarding has been enabled in the kernel. You can enable IP Forwarding by rebuilding the kernel. Once the kernel supports IP Forwarding, you can use your machine as a gateway between the two networks. Other machines on either network can also use your machine as a gateway between the two networks.
Although the examples shown here are for Ethernet connections to two networks, you could have any kind of interface. You could, for example, use an Ethernet card for your local area network, and then use a SLIP or PPP connection to another network (including the Internet).
Configuration Files
Symbolic Machine Names: /etc/hosts
A symbolic name is an alternative to using an IP address. For example, it is much easier to call a neighboring machine darkstar than 147.23.13.32. Whenever a symbolic name is used as an address by an application, the TCP/IP software must be able to resolve that name into a network address (as TCP/IP only uses IP addresses). The ASCII file /etc/hosts is usually employed, with the symbolic names matched to network addresses. (Note that the /etc/hosts file does not apply when Yellow Pages (YP), Network Information Services (NIS), or Domain Name Server (DNS) systems are used. These services use their own configuration files.)
Linux uses the file /etc/hosts to hold the network addresses and symbolic names, as well as a connection called the loopback (which is examined later in this chapter in the section, "Loopback Drivers"). The loopback connection address is usually listed as the machine name loopback or localhost.
The /etc/hosts file consists of the network address in one column and the symbolic name in another. Although the network addresses can be specified in decimal, octal, or hexadecimal format, decimal is the most commonly used form (and use of the others can be downright confusing). You can specify more than one symbolic name on a line by separating the names with white space characters (spaces or tabs). The following is a sample Linux /etc/hosts file:
# network host addresses
127.0.0.1 localhost local merlin_server
157.40.40.12 artemis
157.40.40.2 darkstar
143.10.12.62 big_bob
153.21.63.1 tpci_server tpci_main tpci
191.13.123.4 kitty_cat
Whenever a user or an application specifies a symbolic name, Linux searches the /etc/hosts file for a matching name and then reads the proper address from the same line. You can change the contents of the /etc/hosts file at any time, and the changes are essentially in effect immediately.
Network Names: /etc/networks
This file allows networks to be addressed by a symbolic name, just as machines are, instead of by their IP address. To resolve the network names, the file /etc/networks is used to specify symbolic network names. The format of the file provides a network symbolic name, its network address, and any alias that might be used. A sample /etc/networks file is shown below:
# local network names tpci 146.1 tpci_network tpci_local bnr 47.80 BNR bnr.ca big_net 123.2.21 unique 89.12323 UNIQUE loopback 127 localhost
The last entry in the file gives the loopback name. The first entry specifies the local machine name, its network address, and its name variants that may be used by applications.
Network Protocols: /etc/protocols
TCP/IP uses a special number, called a protocol number, to identify the specific transport protocol a Linux system receives. This allows the TCP/IP software to properly decode the information coming in. A configuration file called /etc/protocols identifies all the transport protocols available on the Linux and gives their respective protocol numbers. All systems have this file, although some entries may be commented out to prevent unwanted intrusion or abuse.
Usually the /etc/protocols file is not modified by the administrator. Instead, the file is maintained by the networking software and updated automatically as part of the installation procedure. The file contains the protocol name, its number, and any alias that may be used for that protocol. A sample /etc/protocols file is shown below:
# protocols ip 0 IP # internet protocol, pseudo protocol number icmp 1 ICMP # internet control message protocol igmp 2 IGMP # internet group multicast protocol ggp 3 GGP # gateway-gateway protocol tcp 6 TCP # transmission control protocol pup 12 PUP # PARC universal packet protocol udp 17 UDP # user datagram protocol idp 22 IDP # WhatsThis? raw 255 RAW # RAW IP interface
The exact contents of the /etc/protocols file on your system may differ a little from the file shown above, but the protocol numbers and names are probably very similar. There may be additional protocols listed, depending on the version of Linux and networking software.
Network Services: /etc/services
The last TCP/IP configuration file used on most Linux systems identifies existing network services. This file is called /etc/services. As with the /etc/protocols file, this file is not usually modified by an administrator, but is maintained by software when installed or configured. The exception is when the /etc/services file has services missing that the application software did not add automatically. In addition, a system administrator can trim the /etc/services file in order to enhance security, such as when setting up a firewall to the local area network.
The /etc/services file is in ASCII format, and consists of the service name, a port number, and the protocol type. The port number and protocol type are separated by a slash. Any optional service alias names follow. The following is a short extract from a sample /etc/services file (the file is usually quite lengthy):
# network services echo 7/tcp echo 7/udp discard 9/tcp sink null discard 9/udp sink null ftp 21/tcp telnet 23/tcp smtp 25/tcp mail mailx tftp 69/udp # specific services login 513/tcp who 513/udp whod
Most /etc/services files will have many more lines, because a wide number of TCP/IP services are supported by most versions of Linux. Most Linux systems are not used as firewalls to the Internet or between LANs, so administrators of most Linux machines will never have to worry about the contents of this file. On the other hand, if your machine is going to act as a firewall or you are very worried about security, you may want to manually modify the /etc/services file.
The inetd Daemon
When a networked Linux machine is started, it activates TCP/IP and immediately accepts connections at its ports, spawning a process for each. To control the processes better, the inetd program was developed to handle the port connections itself, offloading that task from the server. The primary difference is that inetd creates a process for each connection that is established, whereas the server would create a process for each port (which leads to many unused processes). On many systems, some of the test programs and status information utilities are run through inetd.
The inetd program uses the configuration file /etc/inetd.conf. The following code is an extract of a sample /etc/inetd.conf file. The first column shows the service name (which corresponds to an entry in the services file such as /etc/services), the socket type (stream, raw, or datagram), protocol name, whether inetd can accept further connections at the same port immediately (nowait) or must wait for the server to finish (wait), the login that owns the service, the server program name, and any optional parameters needed for the server program.
#inetd.conf
ftp stream tcp nowait NOLUID /etc/ftpd ftpd
telnet stream tcp nowait NOLUID /etc/telnetd telnetd
shell stream tcp nowait NOLUID /etc/rshd rshd
login stream tcp nowait NOLUID /etc/rlogind rlogind
exec stream tcp nowait NOLUID /etc/rexecd rexecd
finger stream tcp nowait nouser /etc/fingerd fingerd
comsat dgram udp wait root /etc/comsat comsat
ntalk dgram udp wait root /etc/talkd talkd
echo stream tcp nowait root internal
discard stream tcp nowait root internal
chargen stream tcp nowait root internal
daytime stream tcp nowait root internal
time stream tcp nowait root internal
echo dgram udp wait root internal
discard dgram udp wait root internal
chargen dgram udp wait root internal
daytime dgram udp wait root internal
time dgram udp wait root internal
The actual /etc/inetd.conf file may be much longer, but the extract above shows the general format of the file. The /etc/inetd.conf file is read when the server is booted and every time a hangup signal is received from an application. This allows dynamic changes to the file, as any modifications would be read and registered on the next file read.
The netstat Command
The netstat program provides comprehensive information about the local system and its TCP/IP system. Administrators commonly use this program to quickly diagnose a problem with TCP/IP. Although netstat's format and specific information differ with the version of Linux, netstat usually supplies the following important summaries, each of which is covered in more detail later:
With some later versions, information about the interprocess communications and other protocol stacks may be appended as well. The information to be displayed can usually be toggled with a command line option. The following are valid options for most versions of netstat are:
|
-a |
Displayd information about all interfaces |
|
-c |
Displays continuously, updating every few seconds |
|
-i |
Displays information about the interfaces |
|
-n |
Displays IP addresses instead of symbolic names |
|
-o |
Displays additional information about timer states, expiration times, and backoff times |
|
-r |
Displays information about the kernel routing table |
|
-t |
Displays information about TCP sockets only |
|
-u |
Displays information about UDP sockets only |
|
-v |
Displays version information |
|
-w |
Displays information about raw sockets only |
|
-x |
Displays information about sockets |
The output from a typical Linux installation that uses the netstat command is shown in the next few sections, which discuss netstat and its output in more detail. As already mentioned, the output and meaning may be different with other versions, but the general purpose of the diagnostic tool remains the same.
Communications End Points
The netstat command with no options provides information on all active communications end points. To display information about a particular type of end point, use the letter of the type from the following list:
|
-a |
All connections |
|
-t |
TCP connections only |
|
-u |
UDP connections only |
|
-w |
RAW connections only |
|
-x |
Socket connections only |
To display all end points that are waiting for a connection (in addition to the sockets specified by one of the above flags), netstat uses the -a option. The -a option by itself will display all sockets.
The output is formatted into columns showing the protocol (Proto), the amount of data in the receive and send queues (Recv-Q and Send-Q), the local and remote addresses, and the current state of the connection. The following is a truncated sample output:
$ netstat -ta Active Internet connections (including servers) Proto Recv-Q Send-Q Local Address Foreign Address (state) ip 0 0 *.* *.* tcp 0 2124 tpci.login merlin.1034 ESTABL. tcp 0 0 tpci.1034 prudie.login ESTABL. tcp 11212 0 tpci.1035 treijs.1036 ESTABL. tcp 0 0 tpci.1021 reboc.1024 TIME_WAIT tcp 0 0 *.1028 *.* LISTEN tcp 0 0 *.* *.* CLOSED tcp 0 0 *.6000 *.* LISTEN tcp 0 0 *.listen *.* LISTEN tcp 0 0 *.1024 *.* LISTEN tcp 0 0 *.sunrpc *.* LISTEN tcp 0 0 *.smtp *.* LISTEN tcp 0 0 *.time *.* LISTEN tcp 0 0 *.echo *.* LISTEN tcp 0 0 *.finger *.* LISTEN tcp 0 0 *.exec *.* LISTEN tcp 0 0 *.telnet *.* LISTEN tcp 0 0 *.ftp *.* LISTEN tcp 0 0 *.* *.* CLOSED
In the preceding sample extract, three TCP connections are active, as identified by the state ESTABL. One has data being sent (as shown in the Send-Q column), while another has incoming data in the queue. The network names and port numbers of the connection ends is shown whenever possible. An asterisk means no end point has yet been associated with that address.
One connection is waiting to be hung up, identified by TIME_WAIT in the state column. After thirty seconds, these sessions are terminated and the connection freed. Any row with LISTEN as the state has no connection at the moment, and is waiting.
You can use the -a option by itself to display a complete list of all connections. The output, which is quite lengthy, looks the same, but includes all connections (active and passive):
$ netstat -a Active Internet connections (including servers) Proto Recv-Q Send-Q Local Address Foreign Address (state) ip 0 0 *.* *.* tcp 0 2124 tpci.login merlin.1034 ESTABL. tcp 0 0 tpci.1034 prudie.login ESTABL. tcp 11212 0 tpci.1035 treijs.1036 ESTABL. tcp 0 0 tpci.1021 reboc.1024 TIME_WAIT tcp 0 0 *.1028 *.* LISTEN tcp 0 0 *.* *.* CLOSED tcp 0 0 *.6000 *.* LISTEN tcp 0 0 *.listen *.* LISTEN tcp 0 0 *.1024 *.* LISTEN tcp 0 0 *.sunrpc *.* LISTEN tcp 0 0 *.smtp *.* LISTEN tcp 0 0 *.time *.* LISTEN tcp 0 0 *.echo *.* LISTEN tcp 0 0 *.finger *.* LISTEN tcp 0 0 *.exec *.* LISTEN tcp 0 0 *.telnet *.* LISTEN tcp 0 0 *.ftp *.* LISTEN tcp 0 0 *.* *.* CLOSED udp 0 0 *.60000 *.* udp 0 0 *.177 *.* udp 0 0 *.1039 *.* udp 0 0 *.1038 *.* udp 0 0 localhost.1036 localhost.syslog udp 0 0 *.1034 *.* udp 0 0 *.* *.* udp 0 0 *.1027 *.* udp 0 0 *.1026 *.* udp 0 0 *.sunrpc *.* udp 0 0 *.1025 *.* udp 0 0 *.time *.* udp 0 0 *.daytime *.* udp 0 0 *.chargen *.* udp 0 0 *.route *.* udp 0 0 *.* *.*
The output is similar to that for the -ta options shown previously, except the UDP (User Datagram Protocol) connections have been added. UDP sessions have no state column because they do not have an end-to-end connection.
Network Interface Statistics
The behavior of the network interface (such as the network interface card) can be shown by using the -i option to the netstat command. This information quickly shows you whether major problems exist with the network connection.
The netstat -i command displays the name of the interface (Iface), the maximum number of characters a packet can contain (MTU), the metric value (not used with Linux), and a set of columns for the number of packets received without problem (RX-OK), received with errors (RX-ERR), received but dropped (RX-DRP), and received but lost due to overrun (RX-OVR). The transmitted packets have similar columns. The last column contains a list of flags set for the interface. The following is a sample output from a netstat -i command:
$ netstat -i
Kernel Interface table
Iface MTU Met RX-OK RX-ERR RX-DRP RX-OVR TX-OK TX-ERR TX-DRP TX-OVR Flags
lo 2000 0 231 0 0 0 231 0 0 0 BLRU
eth0 1500 0 1230 2 9 12 1421 3 2 1 BRU
This extract shows two interfaces in use: an Ethernet device (/dev/eth0) and the loopback driver (lo0). In this case, you can see the Ethernet interface has had a few bad packet receptions. This is normal because of the nature of the Ethernet system, although if the numbers become too high a percentage of the total packets sent, you should start diagnostic methods to find out why.
You can obtain more specific information about one interface by using the -i option with a device name and a time interval, specified in seconds, such as netstat -i eth0 30, to obtain specific information about the behavior of the "eth0" (Ethernet) interface over the last thirty seconds. For example, the output below shows the activity of the Ethernet interface for the last 30 seconds:
$ netstat -i eth0 30
Kernel Interface table
Iface MTU Met RX-OK RX-ERR RX-DRP RX-OVR TX-OK TX-ERR TX-DRP TX-OVR Flags
eth0 1500 0 2341 3 5 112 2111 5 8 8 BRU
The flags column in the netstat output matches the types of flags you saw with the ifconfig command. The meaning of the flags is shown in the following list:
|
B |
Broadcast address has been set |
|
L |
Loopback driver |
|
M |
Promiscuous mode |
|
N |
Trailers are avoided |
|
O |
ARP turned off |
|
P |
Point-to-point connection |
|
R |
Running |
|
U |
Interface is up |
As you can see in the extracts from the previous commands above, several of the flags can be combined into one block.
Data Buffers
Versions of netstat that are based on System V UNIX (instead of BSD UNIX) allow displays of data buffer statistics. Information about the TCP/IP data buffers can be obtained with the netstat command's -m option. Monitoring the behavior of the buffers is important, because they directly impact the performance of TCP/IP. The output of the netstat -m command differs depending on the version of Linux networking software in use, reflecting the different implementations of the TCP/IP code.
The netstat -m command output is shown below. In this version, entries are provided for the streamhead, queue, message descriptor table (mblks), data descriptor table (dblks), and the different classes of data descriptor tables. The columns show the number of blocks currently allocated (alloc), the number of columns free (free), the total number of blocks in use (total), the maximum number of blocks that were in use at one time (max), and the number of times a block was not available (fail).
$ netstat -m streams allocation: config alloc free total max fail streams 292 79 213 233 80 0 queues 1424 362 1062 516 368 0 mblks 5067 196 4871 3957 206 0 dblks 4054 196 3858 3957 206 0 class 0, 4 bytes 652 50 602 489 53 0 class 1, 16 bytes 652 2 650 408 4 0 class 2, 64 bytes 768 6 762 2720 14 0 class 3, 128 bytes 872 105 767 226 107 0 class 4, 256 bytes 548 21 527 36 22 0 class 5, 512 bytes 324 12 312 32 13 0 class 6, 1024 bytes 107 0 107 1 1 0 class 7, 2048 bytes 90 0 90 7 1 0 class 8, 4096 bytes 41 0 41 38 1 0 total configured streams memory: 1166.73KB streams memory in use: 44.78KB maximum streams memory used: 58.57KB
The failure column is important, and tt should always show zeros. If a larger number appears there, it means that the particular resource in question has been overtaxed and the number of blocks assigned to that resource should be increased (followed by a kernel rebuild and a reboot of the system to effect the changes).
Routing Table Information
Routing tables are continually updated to reflect connections to other machines. To obtain information about the routing tables, the netstat -r and -rs options are used (the latter generates statistics about the routing tables).
The output from netstat -r and netstat -rs commands are shown below. The columns show the destination machine, the address of the gateway to be used (an asterisk means no gateway to be used), the Genmask which specifies the generality of the route (which IP addresses can be matched to it), a set of flags, a metric value (not used), a reference counter (Refs) that specifies how many active connections may use that route simultaneously, the number of packets that have been sent over the route (Use), and the interface name.
$ netstat -r
Kernel routing table
Destination Gateway Genmask Flags Metric Ref Use Iface
loopback * 255.0.0.0 U 0 0 21 lo
big_system * 123.23.1.0 UGN 1 0 321 eth0
small_system * 165.213.14.0 UN 1 0 1213 eth0
The flags are used to show different characteristics of the route. The following are valid flags:
|
D |
Generated by ICMP |
|
G |
Uses a Gateway |
|
H |
Only a single host can be reached this way (such as loopback) |
|
M |
Modified by ICMP |
|
U |
Interface is up |
You can combine the -s and -rs options with the -n option to display the IP addresses of the entries in the routing table, instead of the symbolic name (as shown above). The layout and information displayed by the netstat command will vary depending on the Linux implementations, as in the following example:
$ netstat -nr
Kernel routing table
Destination Gateway Genmask Flags Metric Ref Use Iface
127.0.0.1 * 255.0.0.0 U 0 0 21 lo
123.23.1.2 * 123.23.1.0 UGN 1 0 321 eth0
165.213.14.1m * 165.213.14.0 UN 1 0 1213 eth0
This flag saves you from having to figure out the symbolic to IP address translations yourself.
Protocol Statistics
System V-based versions of netstat (as opposed to most Linux BSD-based versions) enable you to display protocol statistics. Statistics about the overall behavior of network protocols can be obtained with the netstat -s command. This usually provides summaries for IP (Internet Protocol), ICMP (Internet Control Message Protocol), TCP (Transmission Control Protocol), and UDP (User Datagram Protocol). The output from this command is useful for determining where an error in a received packet was located, and then leading the user to try to isolate whether that error was due to a software or network problem.
Issuing the netstat -s command provides a verbose output, as shown in the following example:
$ netstat -s ip: 183309 total packets received 0 bad header checksums 0 with size smaller than minimum 0 with data size < data length 0 with header length < data size 0 with data length < header length 0 with unknown protocol 13477 fragments received 0 fragments dropped (dup or out of space) 0 fragments dropped after timeout 0 packets reassembled 0 packets forwarded 0 packets not forwardable 75 no routes 0 redirects sent 0 system errors during input 309 packets delivered 309 total packets sent 0 system errors during output 0 packets fragmented 0 packets not fragmentable 0 fragments created icmp: 1768 calls to icmp_error 0 errors not generated because old message was icmp Output histogram: destination unreachable: 136 0 messages with bad code fields 0 messages < minimum length 0 bad checksums 0 messages with bad length Input histogram: destination unreachable: 68 0 message responses generated 68 messages received 68 messages sent 0 system errors during output tcp: 9019 packets sent 6464 data packets (1137192 bytes) 4 data packets (4218 bytes) retransmitted 1670 ack-only packets (918 delayed) 0 URG only packets 0 window probe packets 163 window update packets 718 control packets 24 resets 9693 packets received 4927 acks (for 74637 bytes) 37 duplicate acks 0 acks for unsent data 5333 packets (1405271 bytes) received in-sequence 23 completely duplicate packets (28534 bytes) 0 packets with some dup. data (0 bytes duped) 38 out-of-order packets (5876 bytes) 0 packets (0 bytes) of data after window 0 window probes 134 window update packets 0 packets received after close 0 discarded for bad checksums 0 discarded for bad header offset fields 0 discarded because packet too short 0 system errors encountered during processing 224 connection requests 130 connection accepts 687 connections established (including accepts) 655 connections closed (including 0 drops) 24 embryonic connections dropped 0 failed connect and accept requests 0 resets received while established 5519 segments updated rtt (of 5624 attempts) 5 retransmit timeouts 0 connections dropped by rexmit timeout 0 persist timeouts 0 keepalive timeouts 0 keepalive probes sent 0 connections dropped by keepalive 0 connections lingered 0 linger timers expired 0 linger timers cancelled 0 linger timers aborted by signal udp: 0 incomplete headers 0 bad data length fields 0 bad checksums 68 bad ports 125 input packets delivered 0 system errors during input 268 packets sent
Again, the exact layout of the output changes depending on the version of the networking code. However, you can use the basic information with all formats.
The arp Command
The arp program manages entries in the system's Address Resolution Protocol (ARP) tables. ARP provides the link between the IP address and the underlying physical address. With arp, you can create, modify, or delete entries in the ARP table. Typically, this will have to be performed whenever a machine's network address changes (either because of a change in the network hardware or because of a physical move).
To use the arp program, you need to follow one of the following formats:
arp [-v] [-t type] -a [hostname]
arp [-v] [-t type] -s hostname hwaddress
arp [-v] -d hostname [hostname ...]
When specifying a hostname you can use either a symbolic name or the IP address.
To display the entry for a host or IP address, use the first format shown above. If you do not give a hostname, all hosts are shown. For example, to check the ARP entry for the remote machine darkstar, issue the following command:
$ arp -a darkstar
IP address HW type HW address
147.12.32.1 10Mbps Ethernet 00:00:C0:5A:3F:C2
This command shows that the machine darkstar has the IP address 147.12.32.1, and is reached through a 10Mbps Ethernet connection. You can slightly alter the output by using the -t option with a specific type of interface. Valid values are ax25 (AMPR AX.25 networks), ether (10Mbps Ethernet), and pronet (IEEE 802.5 Token Ring). For example, to show all the Ethernet connections only, use the following command:
arp -t ether -a
To add an entry to the ARP tables, use the second format of the command shown earlier, using the -s option. When adding an entry, the hwaddress refers to the hardware address of the adapter (usually six sets of hexadecimal digits separated by colons). For example, to add an entry for the remote system big_cat, you would issue the command
arp -s big_cat 00:00:c0:10:A1
where the hardware address of the network card is as shown.
Finally, the last format of the arp command shown above is used to delete entries from the ARP table. This format may be necessary when you have incorrectly added an entry to the table or the network has changed. To delete the entry for the machine x-wing, issue this command:
arp -d x-wing
Several other options are valid with many versions of arp, but you will probably never have to use the arp command at all (let alone these more obscure options). If you need more information, the man pages include a list of all valid options and their functions.
The traceroute Command
Most Linux systems have a utility called traceroute available that sends a series of UDP (User Datagram Protocol) datagrams to a target machine. The datagrams are constructed slightly differently depending on their location in the stream sent to the remote machine. The first three datagrams have a field called Time to Live (TTL) set to a value of one, meaning that the first time a router encounters the message it is returned with an expiry message (the datagram has been discarded). The next three messages have the TTL field set to two, three, four, and so on so that each router the messages pass through will return an expiry message until the destination machine is successfully reached.
The traceroute output shows the round trip time of each message (which is useful for identifying bottlenecks in the network) and the efficiency of the routing algorithms (through a number of routers which may not be the best route). The following is sample output from a traceroute command:
$ traceroute black.cat.com
1 TPCI.COM (127.01.13.12) 51ms 3ms 4ms
2 BEAST.COM (143.23.1.23) 60ms 5ms 7ms
3 bills_machine.com (121.22.56.1) 121ms 12ms 12ms
4 SuperGateway.com (130.12.14.2) 75ms 13ms 10ms
5 black.cat.com (122.13.2.12) 45ms 4ms 6ms
This output shows each router the messages were received by until the destination machine was reached. The traceroute command has many options to tailor its behavior, which are all explained in the man page. The traceroute command is usually used by system or network administrators when there are delivery problems with messages or network behavior seems very slow. Because most Linux systems are on small local area networks or are stand-alone, you may never have to use traceroute.
The rpcinfo Command
For RPC (Remote Procedure Call) services, a utility called rpcinfo can determine which RPC services are currently active on the local machine or any remote system that supports RPC. The options supported by rpcinfo vary with the implementation, but all implementations allow flags to decide which type of service to check.
For example, the -p option displays the local portmapper. The following example shows the options supported by the Slackware Linux version of rpcinfo, as well as the output for the portmapper:
merlin:~# rpcinfo
Usage: rpcinfo [ -n portnum ] -u host prognum [ versnum ]
 rpcinfo [ -n portnum ] -t host prognum [ versnum ]
 rpcinfo -p [ host ]
 rpcinfo -b prognum versnum
 rpcinfo -d prognum versnum

merlin:~# rpcinfo -p
 program vers proto port
 100000 2 tcp 111 portmapper
 100000 2 udp 111 portmapper
 100005 1 udp 650 mountd
 100005 1 tcp 652 mountd
 100003 2 udp 2049 nfs
 100003 2 tcp 2049 nfs
As with the traceroute command, most system administrators will never need to use rpcinfo. If you are a network programmer or a network administrator, they may be handy utilities to know about, though.
NFS, the network filesystem, is probably the most prominent network services using RPC. It allows to access files on remote hosts in exactly the same way as a user would access any local files. This is made possible by a mixture of kernel functionality on the client side (that uses the remote file system) and an NFS server on the server side (that provides the file data). This file access is completely transparent to the client, and works across a variety of server and host architectures.
NFS offers a number of advantages:
NFS Daemon
If you want to provide NFS service to other hosts, you have to run the nfsd and mountd daemons on your machine. As RPC-based programs, they are not managed by inetd, but are started up at boot time, and register themselves with the portmapper. Therefore, you have to make sure to start them only after rpc.portmap is running. Usually, you include the following two lines in your rc.inet2 script:
     if [ -x /usr/sbin/rpc.mountd ]; then
             /usr/sbin/rpc.mountd; echo -n " mountd"
     fi
     if [ -x /usr/sbin/rpc.nfsd ]; then
             /usr/sbin/rpc.nfsd; echo -n " nfsd"
     fi
The ownership information of files a NFS daemon provides to its clients usually contains only numerical user and group id's. If both client and server associate the same user and group names with these numerical id's, they are said to share the same uid/gid space. For example, this is the case when you use NIS to distribute the passwd information to all hosts on your LAN.
The exports File
While the above options applied to the client's NFS configuration, there is a different set of options on the server side that configure its per-client behavior. These options must be set in the /etc/exports file.
By default, mountd will not allow anyone to mount directories from the local host, which is a rather sensible attitude. To permit one or more hosts to NFS-mount a directory, it must exported, that is, must be specified in the exports file. A sample file may look like this:
     # exports file for vlager
     /home             vale(rw) vstout(rw) vlight(rw)
     /usr/X386         vale(ro) vstout(ro) vlight(ro)
     /usr/TeX          vale(ro) vstout(ro) vlight(ro)
     /                 vale(rw,no root squash)
     /home/ftp         (ro)
Each line defines a directory, and the hosts allowed to mount it. A host name is usually a fully qualified domain name, but may additionally contain the * and ? wildcard, which act the way they do with the Bourne shell. For instance, lab*.foo.com matches lab01.foo.com as well as laber.foo.com. If no host name is given, as with the /home/ftp directory in the example above, any host is allowed to mount this directory.
When checking a client host against the exports file, mountd will look up the client's hostname using the gethostbyaddr(2) call. With DNS, this call returns the client's canonical hostname, so you must make sure not to use aliases in exports. Without using DNS, the returned name is the first hostname found in the hosts file that matches the client's address.
The host name is followed by an optional, comma-separated list of flags, enclosed in brackets. These flags may take the following values:
insecure
Permit non-authenticated access from this machine.
unix-rpc
Require UNIX-domain RPC authentication from this machine. This simply requires that requests originate from a reserved internet port (i.e. the port number has to be less than 1024). This option is on by default.
secure-rpc
Require secure RPC authentication from this machine. This has not been implemented yet. See Sun's documentation on Secure RPC.
kerberos
Require Kerberos authentication on accesses from this machine. This has not been implemented yet. See the MIT documentation on the Kerberos authentication system.
root squash
This is a security feature that denies the super user on the specified hosts any special access rights by mapping requests from uid 0 on the client to uid 65534 (-2) on the server. This uid should be associated with the user nobody.
no root squash
Don't map requests from uid 0. This option is on by default.
ro
Mount file hierarchy read-only. This option is on by default.
rw
Mount file hierarchy read-write.
link relative
Convert absolute symbolic links (where the link contents start with a slash) into relative links by prepending the nec- essary number of ../'s to get from the directory containing the link to the root on the server. This option only makes sense when a host's entire file system is mounted, else some of the links might point to nowhere, or even worse, files they were never meant to point to.
This option is on by default.
link absolute
Leave all symbolic link as they are (the normal behavior for Sun-supplied NFS servers).
map daemon
This option tells the NFS server to assume that client and server do not share the same uid/gid space. nfsd will then build a list mapping id's between client and server by query- ing the client's ugidd daemon.
An error parsing the exports file is reported to syslogd's daemon facility at level notice whenever nfsd or mountd is started up.
Note that host names are obtained from the client's IP-address by reverse mapping, so you have to have the resolver configured properly. If you use BIND and are very security-conscious, you should enable spoof checking in your host.conf file.
Mounting A NFS Volume
NFS volumes are mounted very much the way usual file systems are mounted. You invoke mount using the following syntax:
# mount -t nfs nfs volume local dir options
nfs_volume is given as remote_host:remote_dir. Since this notation is unique to NFS file systems, you can leave out the -t nfs option.
There are a number of additional options that you may specify to mount upon mounting an NFS volume. These may either be given following the -o switch on the command line, or in the options field of the /etc/fstab entry for the volume. In both cases, multiple options are separated from each other by commas. Options specified on the command line always override those given in the fstab file.
A sample entry in /etc/fstab might be
     # volume              mount point       type  options
     news:/usr/spool/news  /usr/spool/news   nfs   timeo=14,intr
This volume may then be mounted using
# mount news:/usr/spool/news
In the absence of a fstab entry, NFS mount invocations look a lot uglier. For instance, suppose you mount your users' home directories from a machine named moonshot, which uses a default block size of 4K for read/write operations. You might decrease block size to 2K to suit ' datagram size limit by issuing
# mount moonshot:/home /home -o rsize=2048,wsize=2048
The following is an incomplete list of option those you would probably want to use:
rsize=n and wsize=n
These specify the datagram size used by the NFS clients on read and write requests, respectively. They cur- rently default to 1024 bytes, due to the limit on UDP datagram size described above.
timeo=n
This sets the time (in tenths of a second) the NFS client will wait for a request to complete. The default values is 0.7 sec- onds.
hard
Explicitly mark this volume as hard-mounted. This is on by default.
soft
Soft-mount the driver (as opposed to hard-mount).
intr
Allow signals to interrupt an NFS call. Useful for aborting when the server doesn't respond.
Except for rsize and wsize, all of these options apply to the client's behavior if the server should become inaccessible temporarily. They play together in the following way: whenever the client sends a request to the NFS server, it expects the operation to have finished after a given interval (specified in the timeout option). If no confirmation is received within this time, a so-called minor timeout occurs, and the operation is retried with the timeout interval doubled. After reaching a maximum timeout of 60 seconds, a major timeout occurs.
By default, a major timeout will cause the client to print a message to the console and start all over again, this time with an initial timeout interval twice that of the previous cascade. Potentially, this may go on forever. Volumes that stubbornly retry an operation until the server becomes available again are called hard-mounted. The opposite variety, soft-mounted volumes gerenates an I/O error for the calling process whenever a major timeout occurs. Because of the write-behind introduced by the buffer cache, this error condition is not propagated to the process itself before it calls the write(2) function the next time, so a program can never be sure that a write operation to a soft-mounted volume has succeeded at all.
Whether you hard- or soft-mount a volume is not simply a question of taste, but also has to do with what sort of information you want to access from this volume. For example, if you mount your X-programs by NFS, you certainly would not want your X-session to go berserk just because someone brought the network to a grinding halt by firing up seven copies of xv at the same time, or by pulling the Ethernet plug for a moment. By hard-mounting these, you make sure that your computer will wait until it is able to re-establish contact with your NFS-server. On the other hand, non-critical data such as NFS-mounted news partitions or FTP archives may as well be soft-mounted, so it doesn't hang your session in case the remote machine should be temporarily unreachable, or down. If your network connection to the server is flaky or goes through a loaded router, you may either increase the initial timeout using the timeo option, or hard-mount the volumes, but allow for signals interrupting the NFS call so that you may still abort any hanging file access.
Usually, the mountd daemon will in some way or other keep track of which directories have been mounted by what hosts. This information can be displayed using the showmount program, which is also included in the NFS server package. The mountd, however, does not do this yet.

 and then open Windows NT Explorer.
 or File you wish to Share using the LEFT mouse button.


Functionality
There are four basic things that one can do with Samba:
The following two daemons are required for the Samba package. They are typically installed in /usr/sbin and run either on boot from the systems startup scripts or from inetd.
	smbd (The SMB daemon)
        nmbd (Provides NetBIOS nameserver support to clients)
Running the Daemon
The two SMB daemons are /usr/sbin/smbd and /usr/sbin/nmbd. Under most Linux distributions, these are started, stoped and restarted via the startup script located in /etc/rc.d/init.d/smb and symlinked to the appropriate runlevels.
If you choose not to use the standard startup script, you can run the Samba daemons from inetd or as stand-alone processes. Samba will respond slightly faster as a standalone daemon than running from inetd.
In either case, you should check the file /etc/services for lines that look like this:
netbios-ns      137/tcp         nbns
netbios-ns      137/udp         nbns
netbios-dgm     138/tcp         nbdgm
netbios-dgm     138/udp         nbdgm
netbios-ssn     139/tcp         nbssn
Make sure they are all uncommented. Depending on your distribution, you may even need to add them. Samba will not be able to bind to the appropriate ports unless /etc/services has these entries.
General Configuration (etc/smb.conf)
Samba configuration on a Linux (or other UNIX machine) is controlled by a single file, /etc/smb.conf. This file determines which system resources you want to share with the outside world and what restrictions you wish to place on them.
Since the following sections will address sharing Linux drives and printers with Windows machines, the smb.conf file shown in this section is as simple as you can get, just for introductory purposes.
Each section of the file starts with a section header such as [global], [homes], [printers], etc.
The [global] section defines a few variables that Samba will use to define sharing for all resources.
The [homes] section allows a remote users to access their (and only their) home directory on the local (Linux) machine). That is, users trying to connect to this share from Windows machines, will be connected to their personal home directories. Note that to do this, they must have an account on the Linux box.
The sample smb.conf file below allows remote users to get to their home directories on the local machine and to write to a temporary directory. For a Windows user to see these shares, the Linux box has to be on the local network. Then the user simply connects a network drive from the Windows File Manager or Windows Explorer.
; /etc/smb.conf
; Make sure and restart the server after making changes to this file, ex:
; /etc/rc.d/init.d/smb stop
; /etc/rc.d/init.d/smb start

[global]
; Uncomment this if you want a guest account
; guest account = nobody
   log file = /var/log/samba-log.%m
   lock directory = /var/lock/samba
   share modes = yes

[homes]
   comment = Home Directories
   browseable = no
   read only = no
   create mode = 0750

[tmp]
   comment = Temporary file space
   path = /tmp
   read only = no
   public = yes
As shown in the simple smb.conf above, sharing Linux drives with Windows users is easy. However, like everything else with Samba, you can control things to a large degree. Here are some examples:
To share a directory with the public, create a clone of the [tmp] section above by adding something like this to smb.conf:
[public]
   comment = Public Stuff
   path = /home/public
   public = yes
   writable = yes
   printable = no
To make the above directory readable by the public, but only writable by people in group staff, modify the entry like this:
[public]
   comment = Public Stuff
   path = /home/public
   public = yes
   writable = yes
   printable = no
   write list = @staff
It used to be that easy; you would now be able to start Samba and browse the shares from a Windows PC. However, Microsoft has recently made life slightly more difficult for those using Samba. Windows 98, Windows NT (service pack 3 or higher) and later builds of Windows 95 now use encrypted passwords by default. Samba uses unencrypted passwords by default. You can't browse servers when either the client or server is using encrypted passwords, because a connection cannot be made anonymously.
You can tell if you have a password type mismatch between client and server if when you try to connect to a share you see a dialog box which reads something like "You are not authorized to access that account from this machine".
You can either configure your Samba server to use encrypted passwords, or configure the Windows machines to use unencrypted passwords.
To get Windows to work with encrypted SMB passwords:
Windows 95/98 =============
Using the registry editor (regedit), create the registry setting HKEY_LOCAL_MACHINE\System\CurrentControlSet\Services\VxD\VNETSUP Add a new DWORD value: Value Name: EnablePlainTextPassword Data: 0x01.
Windows NT ==========
Using the registry editor (regedit), create the registry setting HKEY_LOCAL_MACHINE\System\CurrentControlSet\Services\Rdr\Parameters Add a new DWORD value: Value Name: EnablePlainTextPassword Data: 0x01
Windows 2000 ============
Using the registry editor (regedit), create the registry setting HKEY_LOCAL_MACHINE\SYSTEM\CurrentControlSet\Services\LanmanWorkStation\Parameters Add a new DWORD value: Value Name: EnablePlainTextPassword Data: 0x01
Once these registry changes have been made, reboot the Windows machine and try to map a network drive on the Samba server again. It should work as long as the Samba server is using plain text passwords.
To configure Samba to use encrypted passwords:
In the [global] section of /etc/smb.conf, add the following lines:
encrypt passwords = yes
smb passwd file = /etc/smbpasswd
If your clients and server are using encrypted passwords, you will not be able to browse the available shares on the server until an initial connection has been made with the appropriate authentication. To get the initial connection, enter the share name manually in the Windows File Manager or Explorer dialog box, in the form '\\<hostname>\<sharename>'. Log onto the server with a username and password that is valid on the server!
If you suspect that your NetBIOS name service is not correctly configured (perhaps because you get 'host not found' errors when trying to connect), try using just the IP address of the server: '\\<host ip address>\<sharename>'.
In order to get filenames to appear correctly, you may also need to set some options in the appropriate share section. These work for Windows 95/98/NT clients, but may need to be modified if you have Windows 3.X clients:
    ; Mangle case = yes seems to give the correct filenames

    ; for Win95/98/NT.
    mangle case = yes

    ; If samba is case sensitive when looking for files
    case sensitive = no

    ; Default case of files that are created
    default case = lower

    ; Preserve case for all filenames
    preserve case = yes

    ; Preserve case for dos (8.3) filenames
    short preserve case = no
Accessing an SMB Share With Linux Machines
Linux (UNIX) machines can also browse and mount SMB shares. Note that this can be done whether the server is a Windows machine or a Samba server!
An SMB client program for UNIX machines is included with the Samba distribution. It provides an ftp-like interface on the command line. You can use this utility to transfer files between a Windows 'server' and a Linux client.
Most Linux distributions also now include the useful smbfs package, which allows one to mount and umount SMB shares. More on smbfs below.
To see which shares are available on a given host, run:
/usr/bin/smbclient -L host
where 'host' is the name of the machine that you wish to view. this will return a list of 'service' names - that is, names of drives or printers that it can share with you. Unless the SMB server has no security configured, it will ask you for a password. Get it the password for the 'guest' account or for your personal account on that machine.
For example:
smbclient -L zimmerman
The output of this command should look something like this:
Server time is Sat Aug 10 15:58:27 1996
Timezone is UTC+10.0
Password:
Domain=[WORKGROUP] OS=[Windows NT 3.51] Server=[NT LAN Manager 3.51]

Server=[ZIMMERMAN] User=[] Workgroup=[WORKGROUP] Domain=[]

        Sharename      Type      Comment
        ---------      ----      -------
        ADMIN$         Disk      Remote Admin
        public         Disk      Public
        C$             Disk      Default share
        IPC$           IPC       Remote IPC
        OReilly        Printer   OReilly
        print$         Disk      Printer Drivers

This machine has a browse list:

        Server               Comment
        ---------            -------
        HOPPER               Samba 1.9.15p8
        KERNIGAN             Samba 1.9.15p8
        LOVELACE             Samba 1.9.15p8
        RITCHIE              Samba 1.9.15p8
        ZIMMERMAN
The browse list shows other SMB servers with resources to share on the network.
To use the client, run:
/usr/bin/smbclient service <password>
where 'service' is a machine and share name. For example, if you are trying to reach a directory that has been shared as 'public' on a machine called zimmerman, the service would be called \\zimmerman\public. However, due to shell restrictions, you will need to escape the backslashes, so you end up with something like this:
/usr/bin/smbclient \\\\zimmerman\\public mypasswd
where 'mypasswd' is the literal string of your password.
You will get the smbclient prompt:
Server time is Sat Aug 10 15:58:44 1996
Timezone is UTC+10.0
Domain=[WORKGROUP] OS=[Windows NT 3.51] Server=[NT LAN Manager 3.51]
smb: \>
Type 'h' to get help using smbclient:
smb: \> h
ls             dir            lcd            cd             pwd
get            mget           put            mput           rename
more           mask           del            rm             mkdir
md             rmdir          rd             prompt         recurse
translate      lowercase      print          printmode      queue
cancel         stat           quit           q              exit
newer          archive        tar            blocksize      tarmode
setmode        help           ?              !
smb: \>
If you can use ftp, you shouldn't need the man pages for smbclient.
Although you can use smbclient for testing, you will soon tire of it for real work. For that you will probably want to use the smbfs package. Smbfs comes with two simple utilties, smbmount and smbumount. They work just like mount and umount for SMB shares.
One important thing to note: You must have smbfs support compiled into your kernel to use these utilities!
The following shows a typical use of smbmount to mount an SMB share called "customers" from a machine called "samba1":
[root@postel]# smbmount "\\\\samba1\\customers" -U rtg2t -c 'mount /customers -u 500 -g 100'
Added interface ip=192.168.35.84 bcast=192.168.255.255 nmask=255.255.0.0
Got a positive name query response from 192.168.168.158 ( 192.168.168.158 )
Server time is Tue Oct  5 10:27:36 1999
Timezone is UTC-4.0
Password:
Domain=[IPM] OS=[Unix] Server=[Samba 2.0.3]
security=user
Issuing a mount command will now show the share mounted, just as if it were an NFS export:
[root@postel]# mount
/dev/hda2 on / type ext2 (rw)
none on /proc type proc (rw)
none on /dev/pts type devpts (rw,mode=622)
//SAMBA1/CUSTOMERS on /customers type smbfs (0)
A resolving, caching name server.
A caching only name server will find the answer to name queries and remember the answer the next time you need it. This will shorten the waiting time the next time significantly, especially if you're on a slow connection.
First you need a file called /etc/named.conf
This is read when named starts. For now it should simply contain:
// Config file for caching only name server
options { directory "/var/named";
// Uncommenting this might help if you have to go through a
// firewall and things are not working out. But you probably
// need to talk to your firewall admin.
// query-source port 53; };
zone "." {
type hint;
file "root.hints";
};
zone "0.0.127.in-addr.arpa" {
type master;
file "pz/127.0.0";
};
The `
directory' line tells named where to look for files. All files named subsequently will be relative to this. Thus pz is a directory under /var/named, i.e., /var/named/pz. /var/named is the right directory according to the Linux File system Standard.
The file named
/var/named/root.hints is named in this. /var/named/root.hints should contain this
;
; There might be opening comments here if you already have this file.
; If not don't worry.
;
.                       6D IN NS        M.ROOT-SERVERS.NET.
.                       6D IN NS        I.ROOT-SERVERS.NET.
.                       6D IN NS        E.ROOT-SERVERS.NET.
.                       6D IN NS        D.ROOT-SERVERS.NET.
.                       6D IN NS        A.ROOT-SERVERS.NET.
.                       6D IN NS        H.ROOT-SERVERS.NET.
.                       6D IN NS        C.ROOT-SERVERS.NET.
.                       6D IN NS        G.ROOT-SERVERS.NET.
.                       6D IN NS        F.ROOT-SERVERS.NET.
.                       6D IN NS        B.ROOT-SERVERS.NET.
.                       6D IN NS        J.ROOT-SERVERS.NET.
.                       6D IN NS        K.ROOT-SERVERS.NET.
.                       6D IN NS        L.ROOT-SERVERS.NET.
;
M.ROOT-SERVERS.NET.     6D IN A         202.12.27.33
I.ROOT-SERVERS.NET.     6D IN A         192.36.148.17
E.ROOT-SERVERS.NET.     6D IN A         192.203.230.10
D.ROOT-SERVERS.NET.     6D IN A         128.8.10.90
A.ROOT-SERVERS.NET.     6D IN A         198.41.0.4
H.ROOT-SERVERS.NET.     6D IN A         128.63.2.53
C.ROOT-SERVERS.NET.     6D IN A         192.33.4.12
G.ROOT-SERVERS.NET.     6D IN A         192.112.36.4
F.ROOT-SERVERS.NET.     6D IN A         192.5.5.241
B.ROOT-SERVERS.NET.     6D IN A         128.9.0.107
J.ROOT-SERVERS.NET.     6D IN A         198.41.0.10
K.ROOT-SERVERS.NET.     6D IN A         193.0.14.129
L.ROOT-SERVERS.NET.     6D IN A         198.32.64.12
The file describes the root name servers in the world. The servers change over time and must be maintained now and then.
The next section in
named.conf is the last zone. Its use will be explain in a later chapter; for now just make this a file named 127.0.0 in the subdirectory pz:
$TTL 3D
@               IN      SOA     ns.linux.bogus. hostmaster.linux.bogus. (
                                1       ; Serial
                                8H      ; Refresh
                                2H      ; Retry
                                4W      ; Expire
                                1D)     ; Minimum TTL
                        NS      ns.linux.bogus.
1                       PTR     localhost.
Next, you need a
/etc/resolv.conf looking something like this:
nameserver 127.0.0.1
A simple domain
DNS is a hierarchical, tree structured, system. The top is written `
.' and pronounced `root', as is usual for tree data-structures. Under . there are a number of Top Level Domains (TLDs); the best known ones are ORG, COM, EDU and NET, but there are many more. Just like a tree it has a root and it branches out. If you have any computer science background you will recognize DNS as a search tree, and you will be able to find nodes, leaf nodes and edges. The dots are nodes, the edges are on the names.
Now to define our own domain. We're going to make the domain
linux.bogus and define machines in it. I use a totally bogus domain name to make sure we disturb no-one Out There.
One more thing before we start: Not all characters are allowed in host names. We're restricted to the characters of the English alphabet: a-z, and numbers 0-9 and the character '-' (dash). Keep to those characters. Upper and lower-case characters are the same for DNS, so
pat.uio.no is identical to Pat.UiO.No.
We've already started this part with this line in
named.conf:
zone "0.0.127.in-addr.arpa" {
        type master;
        file "pz/127.0.0";
};
Please note the lack of `
.' at the end of the domain names in this file. This says that now we will define the zone 0.0.127.in-addr.arpa, that we're the master server for it and that it is stored in a file called pz/127.0.0. We've already set up this file, it reads:
$TTL 3D
@               IN      SOA     ns.linux.bogus. hostmaster.linux.bogus. (
                                1       ; Serial
                                8H      ; Refresh
                                2H      ; Retry
                                4W      ; Expire
                                1D)     ; Minimum TTL
                        NS      ns.linux.bogus.
1                       PTR     localhost.
Please note the `
.' at the end of all the full domain names in this file, in contrast to the named.conf file above. Some people like to start each zone file with a $ORIGIN directive, but this is superfluous. The origin (where in the DNS hierarchy it belongs) of a zone file is specified in the zone section of the named.conf file; in this case it's 0.0.127.in-addr.arpa.
This `zone file' contains 3 `resource records' (RRs): A SOA RR. A NS RR and a PTR RR. SOA is short for Start Of Authority. The `@' is a special notation meaning the origin, and since the `domain' column for this file says 0.0.127.in-addr.arpa the first line really means
0.0.127.in-addr.arpa. IN SOA ...
NS is the Name Server RR. There is no '@' at the start of this line; it is implicit since the previous line started with a '@'. Saves some typing that. So the NS line could also be written
0.0.127.in-addr.arpa. IN NS ns.linux.bogus
It tells DNS what machine is the name server of the domain
0.0.127.in-addr.arpa, it is ns.linux.bogus. 'ns' is a customary name for name-servers, but as with web servers who are customarily named www.something the name may be anything.
And finally the PTR (Domain Name Pointer) record says that the host at address 1 in the subnet
0.0.127.in-addr.arpa, i.e., 127.0.0.1 is named localhost.
The SOA record is the preamble to all zone files, and there should be exactly one in each zone file. It describes the zone, where it comes from (a machine called
ns.linux.bogus), who is responsible for its contents (hostmaster@linux.bogus; you should insert your e-mail address here), what version of the zone file this is (serial: 1), and other things having to do with caching and secondary DNS servers. For the rest of the fields (refresh, retry, expire and minimum) use the numbers used in this HOWTO and you should be safe. Before the SOA comes a mandatory line, the $TTL 3D line. Put it in all your zone files.
Now restart your named (the command is
ndc restart) and use dig to examine your handy work. -x asks for the inverse query:
$ dig -x 127.0.0.1

; <<>> DiG 8.2 <<>> -x
;; res options: init recurs defnam dnsrch
;; got answer:
;; ->>HEADER<<- opcode: QUERY, status: NOERROR, id: 4
;; flags: qr aa rd ra; QUERY: 1, ANSWER: 1, AUTHORITY: 1, ADDITIONAL: 0
;; QUERY SECTION:
;;      1.0.0.127.in-addr.arpa, type = ANY, class = IN

;; ANSWER SECTION:
1.0.0.127.in-addr.arpa.  1D IN PTR  localhost.

;; AUTHORITY SECTION:
0.0.127.in-addr.arpa.   1D IN NS        ns.penguin.bv.

;; Total query time: 5 msec
;; FROM: lookfar to SERVER: default -- 127.0.0.1
;; WHEN: Sat Dec 16 01:13:48 2000
;; MSG SIZE  sent: 40  rcvd: 110
So it manages to get
localhost from 127.0.0.1, good. Now for our main task, the linux.bogus domain, insert a new 'zone' section in named.conf:
zone "linux.bogus" {
        notify no;
        type master;
        file "pz/linux.bogus";
};
In the
linux.bogus zone file we'll put some totally bogus data:
;
; Zone file for linux.bogus
;
; The full zone file
;
$TTL 3D
@       IN      SOA     ns.linux.bogus. hostmaster.linux.bogus. (
                        199802151       ; serial, todays date + todays serial #
                        8H              ; refresh, seconds
                        2H              ; retry, seconds
                        4W              ; expire, seconds
                        1D )            ; minimum, seconds
;
                NS      ns              ; Inet Address of name server
                MX      10 mail.linux.bogus  ; Primary Mail Exchanger
                MX      20 mail.friend.bogus.; Secondary Mail Exchanger
;
localhost       A       127.0.0.1
ns              A       192.168.196.2
mail            A       192.168.196.4
Two things must be noted about the SOA record.
ns.linux.bogus must be a actual machine with a A record. It is not legal to have a CNAME record for the machine mentioned in the SOA record. Its name need not be `ns', it could be any legal host name. Next, hostmaster.linux.bogus should be read as hostmaster@linux.bogus. This should be a mail alias, or a mailbox, where the person(s) maintaining DNS should read mail frequently. Any mail regarding the domain will be sent to the address listed here. The name need not be `hostmaster', it can be your normal e-mail address, but the e-mail address `hostmaster' is often expected to work as well.
There is one new RR type in this file, the MX, or Mail eXchanger RR. It tells mail systems where to send mail that is addressed to
someone@linux.bogus, namely to mail.linux.bogus or mail.friend.bogus. The number before each machine name is that MX RR's priority. The RR with the lowest number (10) is the one mail should be sent to if possible. If that fails the mail can be sent to one with a higher number, a secondary mail handler, i.e., mail.friend.bogus which has priority 20 here.
Restart named by running
ndc restart. Examine the results with dig: $ dig any linux.bogus +pfmin
;; res options: init recurs defnam dnsrch
;; got answer:
;; ->>HEADER<<- opcode: QUERY, status: NOERROR, id: 23499
;; QUERY: 1, ANSWER: 4, AUTHORITY: 1, ADDITIONAL: 1
;; QUERY SECTION:
;; linux.bogus, type = ANY, class = IN
;; ANSWER SECTION:
linux.bogus. 3D IN MX 10 mail.linux.bogus.linux.bogus.
linux.bogus. 3D IN MX 20 mail.friend.bogus.
linux.bogus. 3D IN NS ns.linux.bogus.
linux.bogus. 3D IN SOA ns.linux.bogus. hostmaster.linux.bogus. (
199802151 ; serial
8H ; refresh
2H ; retry
4W ; expiry
1D ) ; minimum
Upon careful examination you will discover a bug. The line
linux.bogus. 3D IN MX 10 mail.linux.bogus.linux.bogus.
is all wrong. It should be
linux.bogus. 3D IN MX 10 mail.linux.bogus.
I deliberately made a mistake so you could learn from it :-) Looking in the zone file we find this line:
MX 10 mail.linux.bogus ; Primary Mail Exchanger
It is missing a period. Or has a 'linux.bogus' too many. If a machine name does not end in a period in a zone file the origin is added to its end causing the double
linux.bogus.linux.bogus. So either
MX 10 mail.linux.bogus. ; Primary Mail Exchanger
or
MX 10 mail ; Primary Mail Exchanger
is correct. I prefer the latter form, it's less to type. There are some BIND experts that disagree, and some that agree with this. In a zone file the domain should either be written out and ended with a `
.' or it should not be included at all, in which case it defaults to the origin.
I must stress that in the named.conf file there should not be `
.'s after the domain names. You have no idea how many times a `.' too many or few have fouled up things and confused the h*ll out of people.
So having made my point here is the new zone file, with some extra information in it as well:
;
; Zone file for linux.bogus
;
; The full zone file
;
$TTL 3D
@       IN      SOA     ns.linux.bogus. hostmaster.linux.bogus. (
                        199802151       ; serial, todays date + todays serial #
                        8H              ; refresh, seconds
                        2H              ; retry, seconds
                        4W              ; expire, seconds
                        1D )            ; minimum, seconds
;
                TXT     "Linux.Bogus, your DNS consultants"
                NS      ns              ; Inet Address of name server
                NS      ns.friend.bogus.
                MX      10 mail         ; Primary Mail Exchanger
                MX      20 mail.friend.bogus. ; Secondary Mail Exchanger

localhost       A       127.0.0.1

gw              A       192.168.196.1
                HINFO   "Cisco" "IOS"
                TXT     "The router"


ns              A       192.168.196.2
                MX      10 mail
                MX      20 mail.friend.bogus.
                HINFO   "Pentium" "Linux 2.0"
www             CNAME   ns

donald          A       192.168.196.3
                MX      10 mail
                MX      20 mail.friend.bogus.
                HINFO   "i486"  "Linux 2.0"
                TXT     "DEK"

mail            A       192.168.196.4
                MX      10 mail
                MX      20 mail.friend.bogus.
                HINFO   "386sx" "Linux 1.2"

ftp             A       192.168.196.5
                MX      10 mail
                MX      20 mail.friend.bogus.
                HINFO   "P6" "Linux 2.1.86"
There are a number of new RRs here: HINFO (Host INFOrmation) has two parts; it's a good habit to quote each. The first part is the hardware or CPU on the machine, and the second part the software or OS on the machine. The machine called 'ns' has a Pentium CPU and runs Linux 2.0. CNAME (Canonical NAME) is a way to give each machine several names. So www is an alias for ns.
CNAME record usage is a bit controversial. But it's safe to follow the rule that a MX, CNAME or SOA record should never refer to a CNAME record, they should only refer to something with an A record, so it is inadvisable to have
foobar CNAME www ; NO!
but correct to have
foobar CNAME ns ; Yes!
It's also safe to assume that a CNAME is not a legal host name for an e-mail address:
webmaster@www.linux.bogus is an illegal e-mail address given the setup above. You can expect quite a few mail admins Out There to enforce this rule even if it works for you. The way to avoid this is to use A records (and perhaps some others too, like a MX record) instead:
www A 192.168.196.2
Load the new database by running
ndc reload, which causes named to read its files again.
$ dig linux.bogus axfr

; <<>> DiG 8.2 <<>> linux.bogus axfr
$ORIGIN linux.bogus.
@              3D IN SOA       ns hostmaster (
                               199802151       ; serial
                               8H              ; refresh
                               2H              ; retry
                               4W              ; expiry
                               1D )            ; minimum

               3D IN NS        ns
               3D IN NS        ns.friend.bogus.
               3D IN MX        10 mail
               3D IN MX        20 mail.friend.bogus.
               3D IN TXT       "Linux.Bogus, your DNS consultants"
gw             3D IN TXT       "The router"
               3D IN HINFO     "Cisco" "IOS"
               3D IN A         192.168.196.1
localhost      3D IN A         127.0.0.1
mail           3D IN HINFO     "386sx" "Linux 1.2"
               3D IN MX        10 mail
               3D IN MX        20 mail.friend.bogus.
               3D IN A         192.168.196.4
www            3D IN CNAME     ns
donald         3D IN TXT       "DEK"
               3D IN HINFO     "i486" "Linux 2.0"
               3D IN MX        10 mail
               3D IN MX        20 mail.friend.bogus.
               3D IN A         192.168.196.3
ns             3D IN HINFO     "Pentium" "Linux 2.0"
               3D IN MX        10 mail
               3D IN MX        20 mail.friend.bogus.
               3D IN A         192.168.196.2
ftp            3D IN HINFO     "P6" "Linux 2.1.86"
               3D IN MX        10 mail
               3D IN MX        20 mail.friend.bogus.
               3D IN A         192.168.196.5
@              3D IN SOA       ns hostmaster (
                               199802151       ; serial
                               8H              ; refresh
                               2H              ; retry
                               4W              ; expiry
                               1D )            ; minimum

;; Received 29 answers (29 records).
;; FROM: lookfar to SERVER: 127.0.0.1
;; WHEN: Sat Dec 16 01:35:05 2000
That's good. As you see it looks a lot like the zone file itself. Let's check what it says for
www alone:
$ dig www.linux.bogus +pfmin
;; res options: init recurs defnam dnsrch
;; got answer:
;; ->>HEADER<<- opcode: QUERY, status: NOERROR, id: 27345
;; QUERY: 1, ANSWER: 2, AUTHORITY: 2, ADDITIONAL: 1
;; QUERY SECTION:
;;      www.linux.bogus, type = A, class = IN

;; ANSWER SECTION:
www.linux.bogus.        3D IN CNAME     ns.linux.bogus.
ns.linux.bogus.         3D IN A         192.168.196.2
In other words, the real name of
www.linux.bogus is ns.linux.bogus, and it gives you some of the information it has about ns as well, enough to connect to it if you were a program.
Now we're halfway.
The reverse zone
Now programs can convert the names in linux.bogus to addresses which they can connect to. But also required is a reverse zone, one making DNS able to convert from an address to a name. This name is used by a lot of servers of different kinds (FTP, IRC, WWW and others) to decide if they want to talk to you or not, and if so, maybe even how much priority you should be given. For full access to all services on the Internet a reverse zone is required.
Put this in
named.conf:
zone "196.168.192.in-addr.arpa" {
        notify no;
        type master;
        file "pz/192.168.196";
};
This is exactly as with the
0.0.127.in-addr.arpa, and the contents are similar:
$TTL 3D
@       IN      SOA     ns.linux.bogus. hostmaster.linux.bogus. (
                        199802151 ; Serial, todays date + todays serial
                        8H      ; Refresh
                        2H      ; Retry
                        4W      ; Expire
                        1D)     ; Minimum TTL
                NS      ns.linux.bogus.

1               PTR     gw.linux.bogus.
2               PTR     ns.linux.bogus.
3               PTR     donald.linux.bogus.
4               PTR     mail.linux.bogus.
5               PTR     ftp.linux.bogus.
Now you restart your named (
ndc restart) and examine your work with dig again:
$ dig -x 192.168.196.4 +pfmin
;; res options: init recurs defnam dnsrch
;; got answer:
;; ->>HEADER<<- opcode: QUERY, status: NOERROR, id: 8764
;; QUERY: 1, ANSWER: 1, AUTHORITY: 1, ADDITIONAL: 1
;; QUERY SECTION:
;;      4.196.168.192.in-addr.arpa, type = ANY, class = IN

;; ANSWER SECTION:
4.196.168.192.in-addr.arpa.  3D IN PTR  mail.linux.bogus.
so, it looks OK, dump the whole thing to examine that too:
dig -x 192.168.196 AXFR

; <<>> DiG 8.2 <<>> -x AXFR
$ORIGIN 196.168.192.in-addr.arpa.
@                       3D IN SOA       ns.linux.bogus. hostmaster.linux.bogus. (
                                        199802151       ; serial
                                        8H              ; refresh
                                        2H              ; retry
                                        4W              ; expiry
                                        1D )            ; minimum

                        3D IN NS        ns.linux.bogus.
4                       3D IN PTR       mail.linux.bogus.
2                       3D IN PTR       ns.linux.bogus.
5                       3D IN PTR       ftp.linux.bogus.
3                       3D IN PTR       donald.linux.bogus.
1                       3D IN PTR       gw.linux.bogus.
@                       3D IN SOA       ns.linux.bogus. hostmaster.linux.bogus. (
                                        199802151       ; serial
                                        8H              ; refresh
                                        2H              ; retry
                                        4W              ; expiry
                                        1D )            ; minimum

;; Received 8 answers (8 records).
;; FROM: lookfar to SERVER: 127.0.0.1
;; WHEN: Sat Dec 16 01:44:03 2000
Windows NT Server DNS Configuration
Installing the DNS Service
 Verify DNS information in Windows NT
Before installing the actual Microsoft DNS service, it is important that the Windows NT Server 4.0 server's TCP/IP stack is configured correctly. In particular, the DNS section needs to be verified, because the DNS service gets many of its default settings from this section during setup.
To verify this information, run Control Panel and go into Network. Click the Protocols tab. Pull up the properties dialog box for the TCP/IP Protocol and click the DNS tab. Verify that you have a correct Host Name and Domain filled in on this screen.
Figure 9.1 Verifying DNS information in TCP/IP properties
Note If the domain name and host name are supplied in the network control panel setup when you create a zone, DNS will add SOA, A, and NS records to the database. If the information is not configured, only the SOA record is created.
Installing the Microsoft DNS Service
To install the Microsoft DNS Service on a Windows NT 4.0-based system, run the Control Panel and go into Network. Click the Services tab, then click the Add button. Highlight Microsoft DNS Server and click OK.

Figure 9.2 Installing Microsoft DNS Server service
At this point, a default installation of Microsoft DNS server service will be installed on the Windows NT-based server. This installation will install files in your \<SystemRoot>\system32\Dns directory as shown. At this point, you will be prompted to restart your server.
Figure 9.3 Location of default DNS Server service installation
Configuring DNS Domains and Zones
To configure the DNS server, run the DNS Manager under the Administrative Tools. Initially, the DNS Manager will not have any servers in its list. To add the local server, pull down the DNS menu and click New Server. Fill in the name of your local server and click OK. The server will then show up in the Server List. Double-click the server to see the server statistics and zones that have been defined.

Figure 9.4 Configuring DNS Server
Since the DNS server initially has no information about your specific network, the DNS server service installs as a caching-only name server for the Internet. This means that DNS only contains information on the Internet root servers. For most DNS configurations, additional information must be supplied to obtain the desired operation.
The first step in configuring the DNS server is to determine the hierarchy for your DNS domains and zones. Design considerations for a DNS hierarchy are discussed in the next section of this paper. Once the domain and zone information have been determined, the information must be entered into the DNS configuration using the DNS Manager.
Since DNS information is grouped and controlled by zones, a zone must first be created. To do this, click the server name with the alternate mouse button and then click New Zone.
Note If you double-click the CACHE zone, you can see all of the hosts that the DNS server has statically defined and dynamically cached due to a previous query. The CACHE will also show all of the WINS entries that have been resolved and have not elapsed their WINS-specific Cache Time-out Value.
Figure 9.5 Creating a zone
 At this point, a dialog is presented that asks if the zone you are creating is a primary zone (information stored locally) or a secondary zone (information obtained from a master server by a zone transfer). If it is a primary zone, no additional information is needed at this step. If it is a secondary zone, you must also enter the zone and master server names in this screen.
Figure 9.6 Primary zone
The next step is to fill in the zone name and zone file information for the local server. This will determine how the zone shows up in the DNS Manager and what file name it is stored under. If this is a secondary zone, this zone name should match the master server zone name. If this zone file already exists in the DNS directory, DNS will import these records automatically when this zone is created.

Figure 9.7 Secondary zone
If this is a secondary zone, you would then be asked to enter the IP address of the master name servers (the name servers with which you will do zone transfers for this zone).

Figure 9.8 IP master information for secondary zone
Once all this information is entered, the zone will be added to the DNS hierarchy. If you have additional zones that need to be added, follow the same procedure for each zone. Once all zones have been added to the server, you should then add any DNS subdomains under the zones that your hierarchy might contain. To do this, click the appropriate zone with the alternate mouse button and click New Domain.
Figure 9.9 Adding subdomains
Enter the name of the new subdomain in the dialog box and click OK. If multiple levels of subdomains are needed, create each successive subdomain by clicking the immediate parent with the alternate mouse button, clicking New Domain, and entering the name of the new subdomain.
This process can also be used for adding new host or resource records at any domain location within the DNS hierarchy.
MUAs, MTAs, and MDAs
There are three main parts of the Unix E-mail system:
|
Part |
What It Does |
Examples |
|
Mail User Agent (MUA) |
The MUA is the program which the user uses to read and send e-mail. It reads incoming messages that have been delivered to the user's mailbox, and passes outgoing messages to an MTA for sending. |
elm , pine, mutt |
|
Mail Transfer Agent (MTA) |
The MTA basicly acts as a "mail router". It accepts a message passed to it by either an MUA or another MTA, decides based upon the message header which delivery method it should use, and then passes the message to the appropriate MDA for that delivery method. |
sendmail , postfix, qmail |
|
Mail Delivery Agent (MDA) |
The MDA accepts a piece of mail from an MTA and performs the actual delivery. |
mail.local , procmail |
The MTA is the most important one of these. It is responsible for doing all the "intelligent" work of e-mail transfer. While it does not actually perform any of the delivery itself, it is the part which tells the other parts how to interact and what to do. In a sense, the MTA is the glue which holds the whole process together.
To illustrate how the three parts of the email system work together, here's a very general example. This is what happens when the user
jsmith@host1.uiuc.edu sends e-mail to johndoe@host2.uiuc.edu:
Structure of an Email Message
Email messages are compose of two parts:
Example:
From johndoe@students.uiuc.edu  Mon Jul  5 23:46:19 1999
Received: (from johndoe@localhost)
        by students.uiuc.edu (8.9.3/8.9.3) id LAA05394;
        Mon, 5 Jul 1999 23:46:18 -0500
Received: from staff.uiuc.edu (staff.uiuc.edu [128.174.5.59])
        by students.uiuc.edu (8.9.3/8.9.3) id XAA24214;
        Mon, 5 Jul 1999 23:46:25 -0500
Date: Mon, 5 Jul 1999 23:46:18 -0500
From: John Doe <johndoe@students.uiuc.edu>
To: John Smith <jsmith@staff.uiuc.edu>
Message-Id: <199907052346.LAA05394@students.uiuc.edu>
Subject: This is a subject header.

This is the message body.  It is seperated from the headers by a blank
line.

The message body can span multiple lines.
The Mail Queue
In a normal configuration,
sendmail sits in the background waiting for new messages. When a new connection arrives, a child process is invoked to handle the connection, while the parent process goes back to listening for new connections.When a message is received, the
sendmail child process puts it into the mail queue (usually stored in /var/spool/mqueue). If it is immediately deliverable, it is delivered and removed from the queue. If it is not immediately deliverable, it will be left in the queue and the process will terminate.Messages left in the queue will stay there until the next time the queue is processed. The parent
sendmail will usually fork a child process to attempt to deliver anything left in the queue at regular intervals.
Configuring Sendmail
What does the configuration file do?
The configuration file is responsible for telling
sendmail several important things about how it should handle mail:This information can actually be quite complex, especially for a large mail hub.
The
/etc/mail/sendmail.cf file was designed to be quickly parsable by sendmail, not to be human-readable, and it's widely considered to be one of the most cryptic things a Unix administrator needs to deal with. So, starting with version 8, a set of macros for the m4 macro language were written to make it much easier to create, modify, and maintain all of the common configurations for the sendmail.cf file. The file which contains these macros is called a .mc file.|
.cf Files |
.mc Files |
|
|
Flexible |
very |
not totally, but covers 99% of situations |
|
Understandable |
no |
yes |
|
Quickly machine-parsed |
yes |
no |
The
.mc files are kept in the cf/cf directory of the sendmail source tree. This tutorial will only cover some of the more commonly useful configuration macros. For a more complete list, see the README file in the upper cf directory.
The Structure of a
.mc FileThe basic structure of a .mc file is as follows:
OSTYPE()
Your
.mc file must start with exactly one OSTYPE() macro, which tells m4 what platform you're running so that it can fetch the appropriate defaults from the cf/ostype/ostype.m4 file. For example, if you say OSTYPE(linux), m4 will read the file cf/ostype/linux.m4.define()
You can use zero or more
define() directives to set variables which control the operation of the configuration macros. The syntax is:define(`variable', `value')
Normally, both the variable and the value are quoted as shown to prevent their expansion by
m4 itself.FEATURE()
Zero or more
FEATURE() macros can be used to select which special features your configuration will use or support.MAILER()
One or more
MAILER() macros must be used to define which MDAs are used by your configuration. Usually, you only need to define the local MDA and the SMTP MDA, like this:MAILER(smtp) MAILER(local)
Configuration Variables
Here is a list of some of the common variables used in the
.mc file and their purpose:|
Variable |
Purpose |
|
confSMTP_LOGIN_MSG |
This defines the one-line message which is displayed when a remote MTA connects to sendmail's SMTP port. Variable expansion is done for many variables, including:$j local hostname$v version of the sendmail binary$Z version of the sendmail.cf file$b current timeThis can be changed for fun to something like $j sendmail $v/$Z ready to serve your every whim at $b. |
|
confMAX_MESSAGE_SIZE |
This is the maximum message size allowed for local delivery. I recommend setting this to 5242880 (5MB) to avoid mail bombs. |
|
confPRIVACY_FLAGS |
This allows you to set some restrictions on what other users are allowed to find out about sendmail's operation. Common values are:authwarnings Issue warnings about authenticity of header information.restrictqrun Only allow root to run the mail queue manually.restrictmailq Only allow root to see the contents of the mail queue.noexpn Do not allow the SMTP EXPN command, which allows remote users to see the result of an alias expansion on the local machine.novrfy Do not allow the SMTP VRFY command, which allows remote users to verify the existance of a user account on your machine.Multiple privacy flags can be specified, seperated by commas. |
|
confQUEUE_LA |
Load average at which sendmail puts incoming email into the queue rather than attempt to deliver it immediately. |
|
confREFUSE_LA |
Load average at which to stop accepting new incoming SMTP connections. |
FEATURE
Some special features can be turned on with the FEATURE() macro. Here are the most commonly useful ones.
|
Feature |
Explanation |
|
define(`confEBINDIR', `/usr/local/libexec') FEATURE(smrsh) |
Use smrsh (the sendmail restricted shell) instead of /bin/sh for program delivery. This is usually done for security reasons, since smrsh allows you to restrict which programs are run by users. The smrsh binary is installed in the directory specified by the confEBINDIR variable. |
|
FEATURE(local_procmail) |
If you have procmail installed, I highly recommend that you use it for your local MDA. procmail is both an extremely flexible and useful tool for users to filter their incoming mail, but it also serves as an excellent cross-platform standard MDA for heterogeneous environments. |
|
define(`confCW_FILE', `-o /etc/mail/local-host-names') FEATURE(use_cw_file) |
Normally, sendmail will assume that only mail addressed to your hostname should be delivered locally, and that other mail should be forwarded to the destination address. If you use this feature, you can create a file called /etc/mail/local-host-names (the path can be changed via the confCW_FILE define, as shown) which contains a list of other destination addresses which should be considered local. |
|
FEATURE(no_default_msa) |
Starting in version 8.10, sendmail listens on port 587 port to support MSA (Mail Submission Agent). This is intended to be used by POP/IMAP clients such as Eudora instead of the "SMTP Server" setting they use today. Currently, there aren't many clients which support MSA, but it is expected that support for this will increase over time. |
Masquerading
You can have your host masquerade as another by using this macro:
MASQUERADE_AS(`host.domain')
Masquerading is a very important part of a client/server mail hub configuration. Any machine configured like this will rewrite the SMTP
From: header of all outbound mail to look like the message came from the address you're masquerading as. This address must be an address record in DNS, not simply a CNAME, or the remote end will canonicalize the address back to the original name.The
FEATURE(allmasquerade) macro is also important. It will cause the recipient addresses to be masquerades as well as the sender's address. This is often useful on a cluster of machines which masquerade as a central mail server when you would like all addresses on the cluster to look to the outside world like they come from the mail server.Relaying
Starting in version 8.9,
sendmail will not relay mail from one external host to another unless specificly configured to do so. This was done to prevent spammers from using other sites' mail servers to deliver their spam for them.To enable a specific host to relay through your
sendmail configuration, add its hostname to the /etc/mail/relay-domains file. Normally, entries in this file represent entire domains which are allowed to relay. However, if you want to list specific hosts in this file and not subdomains, you can use FEATURE(relay_hosts_only).If for some reason you need to configure
sendmail to relay all traffic it encounters, the FEATURE(promiscuous_relay) macro causes the old behavior to occur, where sendmail will relay anything. However, using this macro is strongly discouraged, since it will allow spam to be relayed through your mail server.
Database Maps
One of the most useful features of
sendmail is its ability to look up addresses based on external maps. Many different types of maps are supported, ranging from local DB or DBM databases to network-based services such as PH, LDAP, or NIS. If sendmail was compiled with -DNEWDB, the default map type is hash. Otherwise, the default map type is dbm.There are several
FEATURE() macros which allow you to make use of the maps supported by sendmail:
|
Feature |
Explanation |
|
FEATURE(virtusertable) |
This map allows you to support virtual domains on a single mail server. Here's an example database: info@foo.com foo-info info@bar.com bar-info joe@bar.com error:nouser No such user here jax@bar.com error:D.S.N:unavailable Address invalid @baz.org jane@example.net @foo.org %1@example.com old+*@foo.org new+%2@example.com Email sent to the addresses on the left will be delivered to the corresponding address on the right. If the address on the right starts with error:, the mail is bounced with the specified error message. If the address on the left does not have a user name, all users at the specified domain will be sent to the address on the right, and the %1 token will be replaced with the username from the original address. If the original address is of the form "user+detail", it will match an entry of user+* on the left, and the token %2 will be replaced with the original "detail" string.The default filename for this database is /etc/mail/virtusertable. |
|
FEATURE(domaintable) |
Allows for selective rewriting of domain names. For example, the entry ux4.cso.uiuc.edu students.uiuc.edu would cause all email for ux4.cso.uiuc.edu to be processed as students.uiuc.edu.The default filename for this database is /etc/mail/domaintable. |
|
FEATURE(mailertable) |
A mailertable is a database which maps certain hosts or domains to a mailer:host pair. It is used for redirecting mail addressed to a certain host or domain to a specific destination host using a specific mailer (for example, for using phquery).The default filename for this database is /etc/mail/mailertable. |
|
FEATURE(access_db) |
This sets up an access control database, which allows the administrator to control what users and hosts are allowed to send mail to the local machine or are allowed to relay mail through the local machine. See the Anti-Spam page for more information.The default filename for this database is /etc/mail/access. |
Each feature macro accepts an optional argument which can override the default map type and database name. For example, the default filename for the
mailertable map is /etc/mail/mailertable. To force it to use a dbm map using the file /etc/mailmap, you would use something like this:FEATURE(mailertable, dbm -o /etc/mailmap)
Note that using
-o before the filename tells sendmail that the map is optional, so that it is not considered an error if the map does not exist.Generating a
sendmail.cf File from a .mc FileNow that you've written a .mc file for your host, it's time to generate a sendmail.cf file.
m4 ../m4/cf.m4 filename.mc > sendmail.cf
(Of course, replace
filename.mc with the name of your file.)Commandline Arguments
By default, sendmail will read a message from stdin and deliver it to the address(es) passed on the commandline. But sendmail has many other operating modes as well. The flags passed to sendmail when it is invoked tell it how to operate. The most commonly useful ones are explained here.
The -b flag (which stands for "become") tells sendmail which major operating mode it should run in, as follows:
|
Flag |
Description |
|
-bd |
This is for "become daemon". sendmail will background itself and listen for incoming SMTP connections from the network. |
|
-bi |
This tells sendmail to initialize its aliases database. This is assumed when sendmail is invoked as newaliases. |
|
-bp |
Print out the mail queue, just like the mailq command. |
|
-bs |
Run an SMTP session on stdout and stdin, just as if you'd telnetted to port 25. |
|
-bv |
Verify address mode. This flag should be followed with a list of addresses to verify. |
Here are some other commonly useful
sendmail flags:|
Flag |
Description |
|
-dX |
Set debugging value to X (not discussed here). |
|
-Fname_of_sender |
Set full name of sender to name_of_sender. Modern versions of sendmail will stamp a warning header on the outgoing message when this option is used, because it can be used to forge email. |
|
-qinterval |
Process the mail queue. If no interval is given, the queue will be processed only once, immediately (just like the runq command). The interval is a number with a unit tag (s for seconds, m for minutes, h for hours, d for days, w for weeks). For example, -q90m and -q1h30m both tell sendmail to process the queue every hour and a half. A typical value for this is 20 to 30 minutes. |
|
-t |
Tells sendmail to get the recipient of the message from the message headers. This is often used by MUAs which call sendmail to deliver outgoing mail so that they do not need to pass the recipient addresses on the commandline. |
|
-v |
Be verbose about alias expansions and other things. |
Starting sendmail
Now that you've installed and configured
sendmail, it's time to start it up and see if it works./usr/sbin/sendmail -bd -q20m
If everything's working fine, you've successfully installed
sendmail.Configuring Microsoft Exchange Server
How Microsoft Exchange Server Works
Microsoft Exchange Server uses clients and servers to accomplish tasks across the network. Exchanging e-mail is similar to using the postal service to send a letter. For example, when a client application sends a message, the server acts as a central post office and routes the message to its destination. Users access messages in their mailbox by using their client e-mail application. When sending mail, the sender only needs to know the address of the recipient, not the details of how the message reaches its destination.
The main components of Microsoft Exchange Server work together in a similar way. When you use Microsoft Exchange Server to send a message, the message is first delivered to a central postoffice called the information store. The information store then determines where the message should be delivered by searching in the directory, which is similar to an address book. Finally, the mail carrier, or message transfer agent (MTA), delivers the message. Meanwhile, the system attendant, which is a background process, makes sure that the system runs smoothly and mail is routed correctly.
The following components provide essential services for Microsoft Exchange Server.
Directory
Contains information about all objects in the system, such as servers, and recipients, such as users' mailboxes, public folders, and distribution lists. Recipients in the directory are also available in the Address Book so that users can look up addresses or information about other users quickly and easily.Information store
Contains the messages in users' mailboxes and public folders.Internet Mail Service
Routes messages between Microsoft Exchange Server and Simple Mail Transfer Protocol (SMTP)-based systems, including Internet mail servers and Post Office Protocol version 3 (POP3) and Internet Message Access Protocol, Version 4rev1 (IMAP4rev1) clients. For information about connecting to other systems, see Microsoft Exchange Server Concepts and Planning.Message transfer agent (MTA)
Routes messages to their destination.System attendant
A maintenance service that must be running for other services to run. It assists with tasks such as generating e-mail addresses and monitoring.Administering Microsoft Exchange Server
The Administrator program (Admin.exe) enables you to view and manipulate the structure of your organization and perform a variety of administrative tasks. To run the Administrator program, you need Administrator permissions for the site where the server is located.
Unless you have granted another user account permission to administer Microsoft Exchange Server, the only accounts with Administrator permissions on a Microsoft Exchange Server computer are the account that was logged on during Setup and the service account provided during Setup. You can add other users with Administrator permissions by using the Administrator program.
Getting to the Administrator window
Connecting to Multiple Microsoft Exchange Server Computers
You can connect to and modify objects on multiple servers. Each server appears in its own window.
Setting Up Your Site
Setting up your site involves configuring several aspects of Microsoft Exchange Server. You must set defaults and values for the following areas before you can use Microsoft Exchange Server.
DS Site Configuration
Settings for deleting objects, creating and scheduling an offline Address Book, and specifying custom attributes.Information Store Site Configuration
Settings for specifying a public folder container, enabling message tracking, creating top-level folders, establishing storage warnings, and connecting to public folders in other sites.Public Folder Server Setup
Settings for the public folder server.Public Folder Setup
Settings for creating and designing public folders, establishing the public folder hierarchy, and configuring the Address Book for public folders.MTA Site Configuration
Settings for routing undeliverable messages, enabling message tracking, and defining messaging defaults.Site Addressing
Settings for routing messages, establishing a schedule for routing table calculation, and defining site addresses.
DS Site Configuration
With DS Site Configuration, you can set values for various items in the directory for your site. The directory contains information about your site, just as a phone book contains information about a community. It contains objects such as mailboxes, distribution lists, public folders, custom recipients, and mailbox agents. This information is used by other components in Microsoft Exchange Server, such as server services.
Use information in the directory to set up offline Address Books and establish custom attributes. You can also determine how long to save a tombstone and how often to remove one. A tombstone is a marker indicating that you have deleted an object from your system.
Getting to the DS Site Configuration property pages
General Properties
Use the DS Site Configuration General property page to define a display name, set the amount of time to save a tombstone, delete the tombstone, and set up anonymous access.
Getting to the DS Site Configuration General property page
Defining the Display Name
Use the General property page to define the display name and view the directory name for the DS Site Configuration object. The display name identifies the object in the Administrator window. The default display name is DS Site Configuration.
|
Option |
Description |
|
Display name |
Type a maximum of 256 alphanumeric characters, which can include spaces and special characters. If no name is provided, the system prompts for a value. |
|
Directory name |
The name is defined during installation. It cannot be changed. |
Changing the Tombstone Lifetime
The tombstone lifetime is the amount of time you want to save a tombstone indicating that an object has been deleted from a directory. For example, when you delete a name from an Address Book, the name is deleted from the server where you specified the action, but a tombstone remains. The tombstone is replicated to other servers and deletes the corresponding directory entry on the other servers.
Note
When you set the tombstone lifetime, consider how often you delete objects, how long replication takes, and how long between server backups. Set a long enough interval so that all servers can be notified of the deleted object before the tombstone is removed. If the tombstone is removed before all servers have been notified of the deletion, the object may still appear in the directory.Changing the Garbage Collection Interval
The garbage collection interval is the number of hours representing the interval at which expired tombstones are deleted. For example, once an object has been deleted and replication has taken place, the tombstone can be removed. At each garbage collection interval, all expired tombstones are deleted.
Note
By removing expired tombstones, you increase disk space and the efficiency of your system.Setting Up Anonymous Access
You can set up the Anonymous account to enable the directory to access containers when anonymous users connect to Microsoft Exchange Server. This account is an internal account, such as the Guest account, used only by the directory. It is different from the account you set on individual containers for anonymous users.
The Anonymous account should be a Windows NT user account with minimal permissions and a password that does not expire.
Information Store Site Configuration
The information store is the central repository for all folders on a server. You can configure all information stores in your site using the Information Store Site Configuration property pages. To set up the information store, you must specify the name of the container where the public folders are located and who can create top-level folders. You can also specify that messages are automatically sent to mailbox owners who have mailboxes over the maximum allotted size. If you want users in your site to be able to connect to public folders in other sites, you can specify the location and relative cost of connecting to that site.
Getting to the Information Store Site Configuration property pages
Top-Level Folder Creation
Use the Top Level Folder Creation property page to specify which users have permission to create top-level public folders in Microsoft Outlook. Top-level public folders are at the highest tier of the public folder tree. Limiting the number of users who can create them enables you to control the public folder hierarchy. After a top-level folder is created, the folder owner can grant permissions that enable other users to create folders below the top-level folder.

Enabling Creation of Top-Level Folders
You can specify that only certain users can create top-level folders. You can select all users on your system, a distribution list, or individuals. If you use a distribution list, you can specify that certain people in that list cannot create top-level folders by entering their names in the Not allowed to create top level folders box.
After you enter a name in the Allowed to create top level folders box, all other users are automatically prevented from creating top-level folders.
Note
When both the Allowed to create top level folders box and the Not allowed to create top level folders box are empty, everyone in the global address list can create top-level folders.Choose Modify, and then select the recipients who can create top-level folders.
|
Option |
Description |
|
Add |
Adds a distribution list or mailbox to the Allowed to Create Top Level Folders box. |
|
Properties |
Displays the properties for the selected mailbox or distribution list. |
|
Find |
Opens the Find dialog box, which enables you to search for a mailbox or distribution list based on properties you specify. |
Preventing Creation of Top-Level Folders
You can prevent people from creating top-level folders in two ways.
Choose Modify, and then select the recipients you want to prevent from creating top-level folders.
|
Option |
Description |
|
Add |
Adds a distribution list or mailbox to the Not allowed to create top level folders box. |
|
Properties |
Displays the properties for the selected mailbox or distribution list. |
|
Find |
Opens the Find dialog box, which allows you to search for a mailbox or distribution list. |
Setting Up a Server with Public Folders
Use the Private Information Store property pages to define a public folder server.
Getting to the Private Information Store property pages
Selecting a Public Folder Server
Use the Private Information Store General property page to specify the public folder server. This is the server where all top-level public folders created by users whose home mailbox is on this server will be stored. The public folder server is also where the users in this private information store can view the public folder hierarchy.
Note
A user's home server is the server where the user's mailbox is stored.MTA Site Configuration
The message transfer agent (MTA) provides the addressing and routing information for sending messages. You use the MTA Site Configuration property pages to set values for all MTAs in your site. You can set the messaging defaults, enable message tracking, specify the recipient of undeliverable messages, and enter a display name for the site.
Getting to the MTA Site Configuration property pages

Messaging Defaults
Use the Messaging Defaults property page to set the criteria for sending messages. This includes setting values such as association parameters, time-outs for sending urgent messages, connection retry times, and checkpoint sizes. The values apply to all messages processed in your site.
Getting to the MTA Site Configuration Messaging Defaults property page
Changing the RTS Values
Reliable transfer service (RTS) values determine how often you want to verify information as it is being transferred, how long you want to wait after an error has occurred to restart the transfer, and how often you want a verification that another system has received your transfer.
|
Option |
Description |
|
Checkpoint size (K) |
Sets the amount of data to be transferred before a checkpoint is inserted. If an error occurs and the message must be retransferred, the process restarts from the most recent checkpoint. If you specify zero, no checkpoint is set. The default is 30. Checkpointing slightly reduces transmission speed. You should decrease the checkpoint size when the connection is less reliable. |
|
Recovery timeout (sec) |
The amount of time after an error occurs that the MTA waits for a reconnection before deleting checkpointed information and restarting the transfer from the beginning. The default is 60. |
|
Window size |
The number of checkpoints that can go unacknowledged before data transfer is suspended. The greater the window size, the greater the transfer rate. The window size determines the amount of resources set aside for the receiving station. Specify window size only if the checkpoint size is greater than zero. The default is 5. |
Changing the Connection Retry Values
Connection retry values determine how many times you want to try to open a connection and send a message and how long you want to wait to reopen a connection or resend a message after an error.
|
Option |
Description |
|
Max open retries |
The maximum number of times the system tries to open a connection before it sends a non-delivery report (NDR). The default is 144. |
|
Max transfer retries |
The maximum number of times the system tries to transfer a message across an open connection. The default is 2. |
|
Open interval (sec) |
The amount of time to wait before attempting to reopen a connection after an error. The default is 600. |
|
Transfer interval (sec) |
The amount of time to wait before resending a message across an open connection after a previous attempt failed. The default is 120. |
Changing the Association Parameters
Associations are paths that are opened to other systems. Each association is contained within a connection and is used to transfer messages to a system. You can have multiple associations in each connection. You can determine how long to keep an association, how long to wait for a response before disconnecting, and the number of messages you will let wait before you open another association.
|
Option |
Description |
|
Lifetime (sec) |
The amount of time to keep an association open to a remote system after a message is sent. The default is 300. |
|
Disconnect (sec) |
The amount of time to wait for a response to a disconnect request before closing the connection. The default is 120. |
|
Threshold (msgs) |
The maximum number of queued messages to a remote system. When this is exceeded, the MTA opens another association. The default is 50. |
Changing the Transfer Time-outs
Messages with different priorities require different levels of attention. For example, an urgent message is processed more quickly than a non-urgent message. If a transfer fails, you must determine how long to wait before sending an NDR. The transfer time-out is the amount of time to wait before sending that NDR. You can assign a different amount of time for each message priority. The higher the sec/K value, the longer the wait.
|
Option |
Description |
|
Urgent |
The amount of time (in sec/K) to wait before sending an NDR for an urgent message. The default is 1000. |
|
Normal |
The amount of time (in sec/K) to wait before sending an NDR for a normal message. The default is 2000. |
|
Non-urgent |
The amount of time (in sec/K) to wait before sending an NDR for a non-urgent message. The default is 3000. |
Resetting Default Values
You can reset each of the values in the Messaging Defaults property page to its default setting.
Site Addressing
Use the Site Addressing property pages to configure addressing and routing properties at the site level. You can specify default e-mail addresses for this site, set up a schedule for recalculating the routing table that controls how messages are sent to other sites, and view the routing information that has been calculated.
You can create or edit partial e-mail addresses for this site. Partial e-mail addresses contain information specific to a site. For example, you can define an X.400 address for a site that contains only X.400-specific information. The next time you create a mailbox, this part of the address is used to generate a full X.400 address for the mailbox.
Note
You should always check these addresses after installation to be sure they are correct and consistent throughout your system.Getting to the Site Addressing property page

Setting Up Site Addresses
The Microsoft Exchange Server automatically generates site addresses for MS Mail, SMTP, and X.400 address types. These addresses are generated based on the organization and site name you specified during installation and are used to create recipient addresses. Sometimes organization names and site names contain characters that are not valid in certain address types. Therefore, you may need to modify the site addresses.
Note
The MS Mail site address cannot be changed using this procedure. You must use the Local Postoffice property page for the MS Mail Connector.Disabling Automatic E-mail Address Generation
You can disable automatic e-mail address generation for individual address types that you do not need. By specifying only those address types that you need, you can reduce network traffic and disk space usage when creating users. Disabling automatic generation for a particular address message type does not remove existing e-mail addresses.
When using directory import to create users, you can disable e-mail addresses at the site level so only those addresses that are enabled are created.
Note
If your users send or receive mail to a particular system (for example Lotus cc:Mail) do not disable the automatic e-mail address generation for that address type unless you plan to create it manually.Removing Automatic E-mail Address Generation
You can remove unused automatic e-mail address generation types to reduce both network traffic when creating new addresses and required disk storage for recipient information. Removing automatic generation of an address type does not remove existing e-mail addresses until the addresses are regenerated.
Internet Mail Service
Microsoft Exchange Server provides connectivity to the Internet and other systems using Simple Mail Transfer Protocol (SMTP). The connector, called the Microsoft Exchange Internet Mail Service, provides access and message exchange to and from any system that uses SMTP.
The Internet Mail Service is fully integrated with Microsoft Exchange Server and the Microsoft Windows NT Server. It is configured using the Microsoft Exchange Server Administrator program. You can administer the Internet Mail Service from any Windows NT Server that is part of your local area network (LAN).
Customizing the Internet Mail Service

Internet Mail Properties
Use the Internet Mail property page to configure the administrator's mailbox, message content, character sets, and message tracking.
Assigning an Administrator's Mailbox
Use the Internet Mail property page to assign an administrator's mailbox to receive error notifications and all messages delivered to the postmaster of this Internet Mail Service.
|
Option |
Description |
|
Show Names from the |
Select the global address list or a container. |
|
Type Name or Select from List |
Type a name or select one from the list. |
|
Properties |
Display the properties for the recipient. |
|
Find |
Search for a name based on a specific set |
Setting Up Non-Delivery Report (NDR) Notifications
You can configure the Internet Mail Service to notify the administrator when non-delivery reports (NDRs) are generated by the Internet Mail Service. Use the Internet Mail property page to specify what types of NDRs will be reported to the administrator.
|
Option |
Description |
|
Always send notifications when non-delivery reports are generated |
Select to send notifications to the administrator for all NDRs. |
|
Send notifications for these non-delivery reports |
Select to specify the types of NDRs the administrator will receive. By default, the Multiple matches for an E-Mail address occurred is the only option selected. |
Specifying the Default Attachment Content Format
Use the Internet Mail property page to specify whether outbound messages with attachments will be encoded using Multipurpose Internet Mail Extensions (MIME) or uuencode. This option can be specified by e-mail domain. These settings override the default format.
Settings configured in client applications can override the default setting and the settings specified by e-mail domain. If the client specifies no content format option and no match is found in the e-mail domain options, the default setting will be used.
Note
Message content should be set for UUENCODE when transferring messages to Microsoft Mail 3.x with Microsoft Mail Gateway to SMTP.|
Option |
Description |
|
Plain text |
A plain text MIME body part is generated for the message. If HTML is also selected, Microsoft Exchange Server provides both Hypertext Markup Language (HTML) and plain text in a MIME multipart/alternative message. |
|
HTML |
A MIME body part in HTML is generated for the message. If Plain text is also selected, Microsoft Exchange Server provides both HTML and plain text in a MIME multipart/alternative message. HTML is an Internet standard that enables rich-text formatting such as bold, color, and italic to appear in messages. |
|
Binhex |
Renders the message body as text with any attachments encoded by the BinHex method, which is commonly used in the Macintosh operating system to encode 8-bit data transmitted on the Internet. |
For more information about MIME and uuencode, see Microsoft Exchange Server Concepts and Planning. For more information about e-mail domain options, see "Specifying Message Content by E-mail Domain" later in this chapter.
Specifying the Default Character Sets
Use the Internet Mail property page to specify the default character set to be used when sending outbound and receiving inbound non-MIME messages. You can also specify the default character set for outbound MIME messages.
Note
The Internet Mail Service should be configured to match remote SMTP hosts; otherwise, the characters that the recipient sees in the message may be misrepresented.|
Option |
Description |
|
MIME |
For outbound messages, the setting is used only if the code page the message was composed in can map to more than one character set. |
|
Non-MIME |
For outbound messages, the setting is always used. For inbound messages, the setting is used no matter what the original character set was. |
Enabling Rich Text for Outbound Messages
Use the Internet Mail property page to configure the Internet Mail Service to send outbound messages using Microsoft Exchange rich text character formatting such as bold, color, and italic. This option also allows preservation of attachment position and the ability to include OLE objects as message attachments.
The attachment information in uuencode mode is included in a file called Winmail.dat. In MIME mode, this information is included in a body part tagged using the MIME content type of application/ms-tnef. If the recipient is not a Messaging Application Programming Interface (MAPI) client and rich text is enabled, the recipient may complain about receiving these attachments. To avoid this situation, use one of the following methods:
When the Internet Mail Service is used as a site connector, this option should be set to Always or User. Rich text should always be enabled when transferring messages to the Microsoft Mail Gateway to SMTP.
Note
To set the Microsoft Exchange rich text for custom recipients, use the Advanced property page for custom recipients.|
Option |
Description |
|
Always |
Always send Microsoft Exchange rich text regardless of how the recipient is configured in the sender's PAB or how the recipient is defined as a custom recipient. |
|
User |
Send Microsoft Exchange rich text only when enabled for the recipient. This is the default. |
|
Never |
Never send Microsoft Exchange rich text regardless of how the recipient is configured in the sender's PAB or how the recipient is defined as a custom recipient. |
For information about setting these options by e-mail domain, see "Specifying Message Content by E-mail Domain" later in this chapter.
Disabling Out-Of-Office Responses
Some client applications can be configured to automatically generate replies to messages received while out of the office. You can stop out-of-office replies from being sent to the Internet.
For information about setting these options by e-mail domain, see "Specifying Message Content by E-mail Domain" later in this chapter.
Disabling Automatic Replies to the Internet
Some client applications can be configured to automatically generate replies to messages. You can stop these messages from going to the Internet using the option in the Internet Mail property page.
For information about setting these options by e-mail domain, see "Specifying Message Content by E-mail Domain" later in this chapter.
Disabling Display Names for Outbound Messages
The Internet Mail Service can be configured to send outbound messages with the sender's display name in addition to the sender's e-mail address. The display name is usually the full name of the sender. For example, Bill Lee's e-mail address might be billl@fab.com, and his display name Bill Lee.
Use the Internet Mail property page to enable or disable sending display names with outbound messages. To view the display name for a recipient, use the recipients container E-mail Addresses property page.
For information about setting these options by e-mail domain, see "Specifying Message Content by E-mail Domain" later in this chapter.
Specifying Message Content by E-mail Domain
If you want to use different encoding methods, character sets, and message sizes for individual domains, use the E-Mail Domain option in the Internet Mail property page. These settings will override the default message content information and allow you to configure individual domains separately.
For example, you may want to use the MIME encoding method for the subdomain sales.fab.com and the uuencode encoding method for the domain fab.com. To do this, list the subdomain before the domain.
Note
Uuencode and rich text should be specified when transferring messages to the Microsoft Mail Gateway to SMTP.|
Option |
Description |
|
E-Mail Domain |
Type the domain name. Subdomains and FQDNs are allowed. IP addresses and wildcard characters are not allowed. The Internet Mail Service will search the list starting at the top and will move down until a match is found. Therefore, subdomains should be listed before domains. |
|
Maximum message size |
Specify the maximum number of kilobytes (KB) for outbound messages or select No limit. The maximum message size specified in the General property page of the Internet Mail Service takes precedence if it is lower than this value. |
|
Attachments (outbound) |
Select an encoding method for message attachments. Settings chosen in the client may override this option. If the client specifies none, and a domain match is not found, the Internet Mail Service default encoding method will be used. |
|
Advanced Options |
Choose whether to specify options such as Microsoft Exchange rich text, word-wrap, and automatic replies. |
|
Character Sets |
Select the character sets that will be used for content conversion. |
For more information about setting the maximum message size, see "Specifying the Maximum Message Size" later in this chapter. For more information about content format, see "Specifying the Default Attachment Content Format" earlier in this chapter. For more information about character sets, see "Specifying the Default Character Set" earlier in this chapter. For more information about rich text, see "Enabling Rich Text for Outbound Messages" earlier in this chapter. For more information about automatic replies, see "Disabling Out-of-Office Responses" and "Disabling Automatic Replies to the Internet" earlier in this chapter.
Specifying a Fixed-width Font
You can use the Internet Mail property page to enable inbound messages to display using fixed-width characters such as Courier. This is useful when text needs to be aligned in columns.
Disabling Client S/MIME Support
You can use the Internet Mail property page to convert multipart/signed messages to unsigned MIME messages. This is useful when mailboxes are being accessed using client software that does not support multipart/signed message format.
Connections Properties
Use the Connections property page to configure transfer mode, message delivery, connection acceptance, security, retry interval, and message time-out options for the Internet Mail Service.
Specifying Inbound and Outbound Transfer Modes
Use the Connections property page to configure the Internet Mail Service to accept inbound messages, send outbound messages, both, or neither. In an organization using one Internet Mail Service, you set the transfer mode to both send and receive messages. In an organization using multiple Internet Mail Services, you can balance responsibility for sending and receiving messages among the services. Use the None option when you want to suspend further message activity when preparing to remove or move the Internet Mail Service.
Note
Setting the transfer mode to Inbound Only will not prevent outbound messages from being queued to this Internet Mail Service. To prevent outbound messages from being queued to this Internet Mail Service, remove the address spaces from the Address Space property page.|
Option |
Description |
|
Inbound & Outbound |
Accept inbound and attempt outbound connections. |
|
Inbound Only |
Only accept inbound connections. |
|
Outbound Only |
Only attempt outbound connections. |
|
None (Flush Queues) |
Do not accept inbound connections. Pending messages are delivered. |
Defining the Maximum Number of Connections and Messages Sent
Use the Connections property page to specify the maximum number of inbound and outbound connections the Internet Mail Service will accept and initiate respectively at one time. You can also define the maximum number of messages sent during each connection and adjust the number of connections and messages based on resources available in your environment. Some mail systems can accept only one connection at a time. The maximum number of combined inbound and outbound connections cannot exceed 1,000.
Note
Setting the maximum number of inbound and outbound connections to 0 does not stop the Internet Mail Service from accepting inbound or attempting outbound connectionsIf you have a server supporting Post Office Protocol version 3 (POP3) or Internet Message Access Protocol Version 4rev1 (IMAP4) clients, you may need to increase the maximum number of simultaneous SMTP connections. POP3 and IMAP4 clients need to create an SMTP connection to the Internet Mail Service to send mail, but the number of simultaneous connections required varies based on the number and type of POP3 and IMAP4 clients.
Tip
Use the Windows NT Performance Monitor to view current connections.|
Option |
Description |
|
Max no. of Inbound Connections |
The maximum number of inbound connections the Internet Mail Service can accept at one time. |
|
Max no. of Outbound Connections |
The maximum number of outbound connections the Internet Mail Service can make at one time. |
|
Max no. of Connections to a single host |
The maximum number of connections the Internet Mail Service can make to a single host at one time. |
|
Max no. of Messages sent in a connection |
The maximum number of messages to be sent during each outbound connection. |
|
Reset default values |
Return all options to default settings. |
Delivering Messages Using DNS
Use the Connections property page to specify whether all outbound messages will be routed using the routing information in the DNS. This is the default. Domains specified in outbound messages will be looked up in DNS. If the domain is found in DNS, the message will be delivered to the corresponding IP address. If the domain is not found, the message will be returned to the sender with an NDR.
For information about specifying message delivery by e-mail domain, see "Delivering Messages by E-mail Domain" later in this chapter. For more information about DNS, see Microsoft Exchange Server Concepts and Planning.
Delivering All Messages to a Single Host
Use the Connections property page to specify that all outbound messages be sent to a single host. If message delivery by e-mail domain is not specified, the message is delivered using the option specified in the Message Delivery section of the Connections property page.
Note
If the domain name of a host is specified, the domain name must be defined in the local Windows NT Server Hosts file or in the DNS. Otherwise, the Internet Mail Service will not start.Delivering Messages by E-mail Domain
Use the Connections property page to define the way messages will be delivered to the destination.
Note
This setting overrides the option you specified under Message Delivery.|
Option |
Description |
|
E-Mail Domain |
Type the domain name for which you will specify delivery options. Do not use an ending period after the FQDN. |
|
Use DNS |
Select when messages to the specified domain should be delivered using DNS queries. |
|
Forward all messages for this domain to host |
Type the host name or IP address of the SMTP host that will process messages for the specified domain. If any host name cannot be resolved, the Internet Mail Service will not start and a Windows NT Event Log message will be generated. This option can be configured to process SMTP mail messages in a round-robin style. For example, you can type a comma-separated list of multiple hosts: host1,host2,host3. The first message will be sent to host1, the second message to host2, the third message to host3, the fourth message to host1, and so on. |
|
Dial using |
Select to use a dial-up connection. Choose one of the dial-up connections specified on the Dial-up Connections property page. |
Accepting Connections from All Hosts
Use the Connections property page to accept connections from all secure and non-secure hosts. This is enabled by default.
Accepting Connections from Secure Hosts
Use the Connections property page to accept connections only from hosts using authentication or encryption.
Accepting Connections from Specific Hosts
Use the Connections property page to reject incoming SMTP connections from a single IP address or range of IP addresses. You can specify a range of addresses to reject and make a list of addresses that will be excluded from the restriction. To do this, specify the hosts from which you will accept mail higher in the list than the more general range of hosts from which connections will be rejected.
|
Option |
Description |
|
IP Address |
Type the IP address of the SMTP hosts that will be accepted or rejected. Use of wildcards is accomplished using the Mask field. If you are specifying only a single IP address to be rejected, you do not need to use the Mask field. |
|
Mask |
Type the IP address mask. To control access, the IP address specified is matched against the IP address of the host that is connecting to the Internet Mail Service. The mask specifies which bits are relevant in the match. In Boolean logic, this is equivalent to exclusive-oring the addresses and then anding the result with the mask. If the result is zero, it is a match. For example: IP 192.11.154.0 Mask: 255.255.255.0 Therefore, any IP address in 192.11.154.n would match, where n = 1-254. |
|
Accept connections from this host |
Select to allow the specified host to connect to the Internet Mail Service computer. |
|
Only accept from this host if it uses |
Select to accept connections from hosts using security. Choose Authentication, Encryption or Auth and Encrypt. |
|
Reject connections from this host |
Select to indicate that the specified host is not allowed to connect to the Internet Mail Service computer. |
|
This host is a relay server |
Select to override client security requirements in the Connections property page. |
|
Option |
Description |
|
Clients can only submit if homed on this server |
Select to allow clients to submit messages only if they have a mailbox on this server. |
|
Clients can only submit if authentication account matches submission address |
Select to allow clients to submit messages only if their logon account matches the address in the From field of the message. |
Setting the Retry Interval
The Internet Mail Service can be set to wait a specified number of hours before retrying a host to which a previous connection attempt has failed. If the Internet Mail Service attempts to deliver a message to an SMTP host for which it has obtained an IP address and does not receive a response from the host, the connector attempts to reconnect after the period of time specified in the Retry interval box.
The first number in the list determines the time the Internet Mail Service will wait between the initial delivery attempt and the first retry. The second number is the amount of time the Internet Mail Service will wait between the first retry and the second retry, and so on. The last specified time interval will be repeated until either the connection is made or the specified time-out value has been reached.
|
Option |
Description |
|
Retry interval (hrs) |
The number of hours to wait before retrying a connection to a host to which delivery has previously been attempted. Values are separated by commas. Periods may be used to indicate partial hours. No spaces are allowed. The default is |
Specifying Message Time-out Values
Message time-out values can be specified for urgent (high importance), normal, and non-urgent (low importance) messages. If the time-out is reached before the message can be sent, the sender is notified with an NDR, and the message is not sent.
|
Option |
Description |
|
Urgent message timeout (hrs) |
The maximum amount of time the Internet Mail Service will try to send a message of high importance. The default is 24 hours. The maximum value is 999. |
|
Normal message timeout (hrs) |
The maximum amount of time the Internet Mail Service will try to send a message of normal importance. The default is 48 hours. The maximum value is 999. |
|
Non-urgent message timeout (hrs) |
The maximum amount of time the Internet Mail Service will try to send a message of low importance. The default is 72 hours. The maximum value is 999. |
Controlling Notifications for Queued Mail
The Internet Mail Service notifies the sender when an outbound message has been queued beyond the time specified in the Connections property page. You can disable notification. The default is to notify the sender only for queued mail of high importance.
|
Option |
Description |
|
Urgent mail every (hrs) |
Select to enable notification for messages of high importance. This is the default. Type a value for the number of hours before notification. The default is 4 hours. |
|
Normal mail every (hrs) |
Select to enable notification for messages of normal importance. Type a value for the number of hours before notification. When selected, the default is 12 hours. |
|
Non-urgent mail every (hrs) |
Select to enable notification for messages of low importance. Type a value for the number of hours before notification. When selected, the default is 24 hours. |
Connected Sites Properties
When the Internet Mail Service is used to connect to an existing Microsoft Exchange Server site, use the Connected Sites property page to ensure directory replication can take place and that other connectors in the organization can be accessed.
Note
Connected sites should list all sites that will receive mail through this Internet Mail Service, regardless of direct or indirect connection to the connector. Knowledge of all other sites are inherited automatically through directory replication.Getting to the Connected Sites property page
Creating a New Connected Site
Use the Connected Sites property page to set up or modify an Internet Mail Service connection to another site.
|
Option |
Description |
|
Organization |
The directory name of the organization. |
|
Site |
The name of the site that will be connected. |
Specifying the Routing Address for Connected Sites
Use the Routing Address property page to provide the FQDN of the Internet Mail Service that will receive mail for the site you are currently configuring. The Internet Mail Service encapsulates the distinguished name (DN) on the message, adds an @ sign, and then appends the routing address to create an FQDN for the SMTP address.
For example, the DN might be o=FAB ou=site cn=bill. Because this is not a valid SMTP address, the Internet Mail Service encapsulates the address.
Note
If you route other address types through this Internet Mail Service (for example, by using the Microsoft Mail address type), do not prefix the SMTP routing address with an at sign (@). If you do, mail to this address type is not routed.When you add a site to the list of connected sites, messages are sent to the site that is directly connected by this Internet Mail Service. The directly connected remote site then forwards messages to the final destination (which can be several hops away).
|
Option |
Description |
|
Type |
The address type is SMTP. |
|
Address |
The details of the address that you want appended to the message. This is the domain name or FQDN of the SMTP host, or Internet Mail Service at another Microsoft Exchange Server site. |
|
Cost |
The value associated with sending to this address, connector, or SMTP host. It can be a number between 1 and 100. The default is 1. |
Address Spaces
Connectors are used to create paths for messages to be sent outside a site. These paths are represented by address spaces. Address spaces can be used to balance the messaging load when you use multiple Internet Mail Services. For example, if you have two Internet Mail Services, you can designate one to process messages destined for domainA and domainB, and the other to process messages destined for domainC. However, if you use two Internet Mail Services to handle a large throughput to a single domain, you can configure both to process the same addresses for equal load balancing.
Note
If you have multiple routes to the same destination, the Internet Mail Service uses only the lowest cost route. If that connection is unavailable due to a communications problem, the Internet Mail Service does not use any of the higher cost routes. You can use mail exchanger (MX) records in DNS to override this and allow incoming mail to use a secondary route.
Getting to the Address Space property page

Specifying an Address Space
Use the Address Space property page to enter information about the addresses you want the connector to process.
Using Routing Addresses for Address Space Entries
Use the Routing Address property page on the address space configuration to send mail to recipients in another site when the sites do not use directory replication. To send to recipients using an address type other than SMTP, configure an address space for that address type, and use the Routing Address property page to specify the FQDN of the computer to which the Internet Mail Service will forward messages.
Note
Only the first entry of any one type of address space will be used.If you route other address types through the Internet Mail Service (for example, by using an Microsoft Mail address space), do not prefix the SMTP routing address in the Routing Address property page with an at sign (@). If you do, mail to this address type is not routed.
|
Option |
Description |
|
Type |
An address type associated with recipients, such as SMTP or X.400. |
|
Address |
The FQDN of the computer to which the Internet Mail Service will forward messages. |
Routing Properties
Use the Routing property page to intercept inbound messages from SMTP hosts, POP3, and IMAP4 clients, and selectively reroute those messages to other SMTP hosts before they are processed by the Internet Mail Service.
Note
If the Internet Mail Service is responsible for delivering messages inbound to Microsoft Exchange Server for domains other than the domain specified in the Site Addressing object, you must add these domains to the Routing property page. If you do not add these additional domains, mail to these domains will generate an NDR without being delivered inbound to Microsoft Exchange Server.The Routing property page contains a list of domain names and associated SMTP hosts. For each recipient of every inbound message the Internet Mail Service receives, the Routing property page compares the domain name on the address to the list of domain names in the Routing property page. If a match is found, the message for that particular recipient is rerouted to the associated host.
The match is compared to the rightmost part of the domain name in the recipient address. Only full subdomains are compared. For example, if the domain name in the table is sea.com, it matches an address of x.sea.com as well as sea.com, but not chelsea.com. The list is searched from the most specific to the least specific match. For example, user@x.sea.com would match x.sea.com, sea.com, or .com. However, if x.sea.com is in the list, it is used because it is the most specific match. This occurs regardless of its placement in the list.
In cases where the associated SMTP host is set for <inbound>, domain names in the list represent names that should be handled by the Internet Mail Service. If the recipient address matches one of these domain names, the Internet Mail Service processes the recipient normally and attempts to deliver the message to the Microsoft Exchange Server computer. If no match is found, the Internet Mail Service reroutes the message outbound to the domain name in the recipient's address. For this reason, it is important to ensure that any domain names that must be routed to the Microsoft Exchange Server computer are listed in the Routing property page. In particular, any domain names used in SMTP addresses for Microsoft Exchange users must be defined in the Routing property page. Otherwise, reports and replies will not be deliverable and could cause routing loops.
Getting to the Routing property page
Choosing a Routing Method
Use the Routing property page to specify whether to reroute incoming mail.
Note
If POP3 or IMAP4 clients are to be accessing the organization, all Internet Mail Services directly connected to the Internet or servicing POP3 or IMAP4 clients should be configured to reroute mail.|
Option |
Description |
|
Do not reroute incoming |
Only messages addressed to recipients listed in the Microsoft Exchange Server global address list are delivered. All other mail is returned with an NDR. |
|
Reroute incoming SMTP mail |
Incoming mail is rerouted according to the entries in the Routing property page. |
Specifying Routing Destinations
Use the Routing property page to specify where inbound mail will be rerouted. To receive mail addressed to the Microsoft Exchange Server organization from the Internet, you must specify at least one inbound route. By default, the Routing box contains the SMTP address in the Configuration container's Site Addressing property page and sets it to route messages inbound.
Note
Mail addressed to any domain not specified is directed outbound.|
Option |
Description |
|
Add |
Create new routing information. |
|
Edit |
Modify routing information. |
|
Remove |
Remove routing information. |
Adding Routing Addresses
Use the Routing property page to determine the routing of messages bound for any domain. You may want inbound mail addressed to your domain to be received by this Internet Mail Service. To do this, you would route all mail destined for the organization to inbound, or you can configure the Internet Mail Service so it translates domain names. For example, you could specify inbound mail addressed to x.sea.com be rerouted to server1.sales.sea.com. If no routing entry is specified for a domain, mail for that domain is rerouted outbound. This allows the Internet Mail Service to forward Internet mail for other hosts.
|
Option |
Description |
|
Should be accepted |
Mail is accepted into the Microsoft Exchange Server organization. |
|
Should be rerouted |
Specify the domain name where the mail will be sent. The Internet Mail Service rewrites the address. |
Modifying a Routing Address
You can edit an address specified in the Routing property page.
Removing a Routing Address
You can delete an address specified in the Routing property page.
Using a Custom Routing Program
Use the Routing property page to specify the name of a custom routing program.
Starting Apache
On Linux, the httpd program is run as a daemon which executes continuously in the background to handle requests.
If the Port specified in the configuration file is the default of 80 (or any other port below 1024), then it is necessary to have root privileges in order to start Apache, so that it can bind to this privileged port. Once the server has started and completed a few preliminary activities such as opening its log files, it will launch several child processes which do the work of listening for and answering requests from clients. The main httpd process continues to run as the root user, but the child processes run as a less privileged user. This is controlled by Apache's process creation directives.
The first thing that httpd does when it is invoked is to locate and read the configuration file httpd.conf. The location of this file is set at compile-time, but it is possible to specify its location at run time using the -f command-line option as in
/usr/local/apache/bin/httpd -f /usr/local/apache/conf/httpd.conf
As an alternative to invoking the
httpd binary directly, a shell script called apachectl is provided which can be used to control the daemon process with simple commands such as apachectl start and apachectl stop.
If all goes well during startup, the server will detach from the terminal and the command prompt will return almost immediately. This indicates that the server is up and running. You can then use your browser to connect to the server and view the test page in the DocumentRoot directory and the local copy of the documentation linked from that page.
Errors During Start-up
If Apache suffers a fatal problem during startup, it will write a message describing the problem either to the console or to the ErrorLog before exiting. One of the most common error messages is "
Unable to bind to Port ...". This message is usually caused by either:
Starting at Boot-Time
If you want your server to continue running after a system reboot, you should add a call to
httpd or apachectl to your system startup files (typically rc.local or a file in an rc.N directory). This will start Apache as root. Before doing this ensure that your server is properly configured for security and access restrictions. The apachectl script is designed so that it can often be linked directly as an init script, but be sure to check the exact requirements of your system.
Main Configuration Files
Apache is configured by placing directives in plain text configuration files. The main configuration file is usually called
httpd.conf. The location of this file is set at compile-time, but may be overridden with the -f command line flag. Some sites also have srm.conf and access.conf files for historical reasons. In addition, other configuration files may be added using the Include directive. Any directive may be placed in any of these configuration files. Changes to the main configuration files are only recognized by Apache when it is started or restarted.
New with Apache 1.3.13 is a feature where if any configuration file is actually a directory, Apache will enter that directory and parse any files (and subdirectories) found there as configuration files. One possible use for this would be to add VirtualHosts by creating small configuration files for each host, and placing them in such a configuration directory. Thus, you can add or remove VirtualHosts without editing any files at all, simply adding or deleting them. This makes automating such processes much easier.
The server also reads a file containing mime document types; the filename is set by the TypesConfig directive, and is
mime.types by default.
Syntax of the Configuration Files
Apache configuration files contain one directive per line. The back-slash "\" may be used as the last character on a line to indicate that the directive continues onto the next line. There must be no other characters or white space between the back-slash and the end of the line.
Directives in the configuration files are case-insensitive, but arguments to directives are often case sensitive. Lines which begin with the hash character "#" are considered comments, and are ignored. Comments may not be included on a line after a configuration directive. Blank lines and white space occurring before a directive are ignored, so you may indent directives for clarity.
You can check your configuration files for syntax errors without starting the server by using
apachectl configtest or the -t command line option.
Modules
|
Related Modules |
Related Directives AddModule ClearModuleList <IfModule> LoadModule |
Apache is a modular server. This implies that only the most basic functionality is included in the core server. Extended features are available through modules which can be loaded into Apache. By default, a base set of modules is included in the server at compile-time. If the server is compiled to use dynamically loaded modules, then modules can be compiled separately and added at any time using the LoadModule directive. Otherwise, Apache must be recompiled to add or remove modules. Configuration directives may be included conditional on a presence of a particular module by enclosing them in an <IfModule> block.
To see which modules are currently compiled into the server, you can use the
-l command line option.
Scope of Directives
|
Related Directives |
Directives placed in the main configuration files apply to the entire server. If you wish to change the configuration for only a part of the server, you can scope your directives by placing them in
<Directory>, <DirectoryMatch>, <Files>, <FilesMatch>, <Location>, and <LocationMatch> sections. These sections limit the application of the directives which they enclose to particular filesystem locations or URLs. They can also be nested, allowing for very fine grained configuration.
Apache has the capability to serve many different websites simultaneously. This is called Virtual Hosting. Directives can also be scoped by placing them inside
<VirtualHost> sections, so that they will only apply to requests for a particular website.
Although most directives can be placed in any of these sections, some directives do not make sense in some contexts. For example, directives controlling process creation can only be placed in the main server context. To find which directives can be placed in which sections, check the Context of the directive. For further information, we provide details on How Directory, Location and Files sections work.
.htaccess Files
|
Related Directives |
Apache allows for decentralized management of configuration via special files placed inside the web tree. The special files are usually called
.htaccess, but any name can be specified in the AccessFileName directive. Directives placed in .htaccess files apply to the directory where you place the file, and all sub-directories. The .htaccess files follow the same syntax as the main configuration files. Since .htaccess files are read on every request, changes made in these files take immediate effect.
To find which directives can be placed in
.htaccess files, check the Context of the directive. The server administrator further controls what directives may be placed in .htaccess files by configuring the AllowOverride directive in the main configuration files.
Log files
security warning
Anyone who can write to the directory where Apache is writing a log file can almost certainly gain access to the uid that the server is started as, which is normally root. Do NOT give people write access to the directory the logs are stored in without being aware of the consequences.
pid file
On startup, Apache saves the process id of the parent httpd process to the file
logs/httpd.pid. This filename can be changed with the PidFile directive. The process-id is for use by the administrator in restarting and terminating the daemon: on Unix, a HUP or USR1 signal causes the daemon to re-read its configuration files and a TERM signal causes it to die gracefully; on Windows, use the -k command line option instead. For more information see the Stopping and Restarting page.
If the process dies (or is killed) abnormally, then it will be necessary to kill the children httpd processes.
Error log
The server will log error messages to a log file, by default
logs/error_log on Unix or logs/error.log on Windows and OS/2. The filename can be set using the ErrorLog directive; different error logs can be set for different virtual hosts.
Transfer log
The server will typically log each request to a transfer file, by default
logs/access_log on Unix or logs/access.log on Windows and OS/2. The filename can be set using a CustomLog directive; different transfer logs can be set for different virtual hosts.
Server-Wide Configuration
Server Identification
|
Related Directives |
The
ServerAdmin and ServerTokens directives control what information about the server will be presented in server-generated documents such as error messages. The ServerTokens directive sets the value of the Server HTTP response header field.
The
ServerName and UseCanonicalName directives are used by the server to determine how to construct self-referential URLs. For example, when a client requests a directory, but does not include the trailing slash in the directory name, Apache must redirect the client to the full name including the trailing slash so that the client will correctly resolve relative references in the document.
File Locations
|
Related Directives |
These directives control the locations of the various files that Apache needs for proper operation. When the pathname used does not begin with a slash "/", the files are located relative to the
ServerRoot. Be careful about locating files in paths which are writable by non-root users.
Process Creation
|
Related Directives |
When
ServerType is set to its recommended value of Standalone, Apache 1.3 for Unix is a pre-forking web server. A single control process is responsible for launching child processes which listen for connections and serve them when they arrive. Apache always tries to maintain several spare or idle server processes, which stand ready to serve incoming requests. In this way, clients do not need to wait for a new child processes to be forked before their requests can be served.
The
StartServers, MinSpareServers, MaxSpareServers, and MaxServers regulate how the parent process creates children to serve requests. In general, Apache is very self-regulating, so most sites do not need to adjust these directives from their default values. Sites which need to serve more than 256 simultaneous requests may need to increase MaxClients, while sites with limited memory may need to decrease MaxClients to keep the server from thrashing (swapping memory to disk and back).
While the parent process is usually started as root under Unix in order to bind to port 80, the child processes are launched by Apache as a less-privileged user. The
User and Group directives are used to set the privileges of the Apache child processes. The child processes must be able to read all the content that will be served, but should have as few privileges beyond that as possible. In addition, unless suexec is used, these directives also set the privileges which will be inherited by CGI scripts.
MaxRequestsPerChild
controls how frequently the server recycles processes by killing old ones and launching new ones.
Under Windows, Apache launches one control process and one child process. The child process creates multiple threads to serve requests. The number of threads is controlled by the
ThreadsPerChild directive.
Network Configuration
|
Related Directives |
When Apache starts, it connects to some port and address on the local machine and waits for incoming requests. By default, it listens to all addresses on the machine, and to the port as specified by the
Port directive in the server configuration. However, it can be told to listen to more than one port, to listen to only selected addresses, or a combination. This is often combined with the Virtual Host feature which determines how Apache responds to different IP addresses, hostnames and ports.
There are two directives used to restrict or specify which addresses and ports Apache listens to. The
BindAddress directive is used to restrict the server to listening to a single IP address. The Listen directive can be used to specify multiple IP addresses and/or Ports to which Apache will listen.
The
ListenBackLog, SendBufferSize, and TimeOut directives are used to adjust how Apache interacts with the network.
The
KeepAlive, KeepAliveTimeout, and MaxKeepAliveRequests directives are used to configure how Apache handles persistent connections.
Limiting Resource Usage
|
Related Directives |
The
LimitRequest* directives are used to place limits on the amount of resources Apache will use in reading requests from clients. By limiting these values, some kinds of denial of service attacks can be mitigated.
The
RLimit* directives are used to limit the amount of resources which can be used by processes forked off from the Apache children. In particular, this will control resources used by CGI scripts and SSI exec commands.
The
ThreadStackSize directive is used only on Netware to control the stack size.
Mapping URLs to Filesystem Locations
|
Related Modules |
Related Directives Alias AliasMatch CheckSpelling DocumentRoot ErrorDocument Options Redirect RedirectMatch RewriteCond RewriteRule ScriptAlias ScriptAliasMatch UserDir |
DocumentRoot
In deciding what file to serve for a given request, Apache's default behavior is to take the URL-Path for the request (the part of the URL following the first single slash) and add it to the end of the DocumentRoot specified in your configuration files. Therefore, the files and directories underneath the
DocumentRoot make up the basic document tree which will be visible from the web.
Apache is also capable of Virtual Hosting, where the server receives requests for more than one host. In this case, a different
DocumentRoot can be specified for each virtual host, or alternatively, the directives provided by the module mod_vhost_alias can be used to dynamically determine the appropriate place from which to serve content based on the requested IP address or hostname.
Files Outside the DocumentRoot
There are frequently circumstances where it is necessary to allow web access to parts of the filesystem which are not strictly underneath the DocumentRoot. Apache offers several different ways to accomplish this. On Unix systems, symbolic links can be used to bring other parts of the filesystem under the
DocumentRoot. For security reasons, symbolic links will only be followed if the Options setting for the relevant directory includes FollowSymLinks or SymLinksIfOwnerMatch.
Alternatively, the Alias directive can be used to map any part of the filesystem into the web space. For example, with
Alias /docs /var/web/
the URL
http://www.example.com/docs/dir/file.html will be served from /var/web/dir/file.html. The ScriptAlias directive works the same way, with the additional effect that all content located at the target path is treated as CGI scripts.
For situations where additional flexibility is required, the AliasMatch and ScriptAliasMatch directives can do powerful regular-expression based matching and substitution. For example,
ScriptAliasMatch ^/~([^/]*)/cgi-bin/(.*) /home/$1/cgi-bin/$2
will map a request to
http://example.com/~user/cgi-bin/script.cgi to the path /home/user/cgi-bin/script.cgi and will treat the resulting file as a CGI script.
User Directories
Traditionally on Unix systems, the home directory of a particular user can be referred to as
~user/. The module mod_userdir extends this idea to the web by allowing files under each user's home directory to be accessed using URLs such as the following.
http://www.example.com/~user/file.html
For security reasons, it would be inappropriate to give direct access to a user's home directory from the web. Therefore, the UserDir directive is used to specify a directory underneath the user's home directory where web files will be located. Using the default setting of
Userdir public_html, the above URL would look for a file at a directory like /home/user/public_html/file.html where the /home/user/ is the user's home directory as specified in /etc/passwd.
There are also several other forms of the
Userdir directive which can be used on systems where /etc/passwd cannot be used to find the location of the home directory.
Some people find the "~" symbol (which is often encoded on the web as
%7e) to be awkward and prefer to use an alternate string to represent user directories. This functionality is not supported by mod_userdir. However, if users' home directories are structured in a regular way, then it is possible to use the AliasMatch directive to achieve the desired effect. For example, to make
http://www.example.com/upages/user/file.html
map to
/home/user/public_html/file.html, the following AliasMatch directive can be used.
AliasMatch ^/upages/([^/]*)/?(.*) /home/$1/public_html/$2
URL Redirection
The configuration directives discussed in the above sections are used to tell Apache to get content from a specific place in the filesystem and return it to the client. Sometimes, it is desirable instead to inform the client that the content being requested is located at an different URL, and instruct the client to make a new request with the new URL. This is referred to as redirection and is implemented by the Redirect directive. For example, if the contents of the directory /foo/ under the DocumentRoot have been moved to the new directory /bar/, clients can instructed to request the content at the new location as follows.
Redirect permanent /foo/ http://www.example.com/bar/
This will redirect any URL-Path starting in
/foo/ to the same URL path on the www.example.com server with /bar/ substituted for /foo/. Note that clients can be redirected to any server, not only the origin server.
Apache also provides a RedirectMatch directive which can be used for more complicated rewriting problems. For example, to redirect requests for the site home page to a different site, but leave all other requests alone, the following configuration can be used.
RedirectMatch permanent ^/$ http://www.example.com/startpage.html
Alternatively, to temporarily redirect all pages on a site to one particular page, the following configuration is useful.
RedirectMatch temp .* http://www.example.com/startpage.html
File Not Found
Inevitably, URLs will be requested for which no matching file can be found in the filesystem. This can happen for several reasons. In some cases, it can be a result of moving documents from one location to another. In this case, it is best to use URL redirection to inform clients of the new location of the resource. In this way, you can assure that old bookmarks and links will continue to work, even though the resource is at a new location.
Another common cause of "File Not Found" errors is accidental mistyping of URLs, either directly in the browser, or in HTML links. Apache provides the module mod_speling (sic) to help with this problem. When this module is activated, it will intercept "File Not Found" errors and look for a resource with a similar filename. If one such file is found, mod_speling will send an HTTP redirect to the client informing it of the correct location. If several "close" files are found, a list of available alternatives will be presented to the client.
An especially useful feature of mod_speling, is that it will compare filenames without respect to case. This can be useful for systems where users are unaware of the case-sensitive nature of URLs and the unix filesystem. However, using mod_speling for anything more than the occasional URL correction can lead to additional load on the server, since each "incorrect" request is followed by a URL redirection and a new request from the client.
If all attempts to locate the content fail, Apache returns an error page with HTTP status code 404 (file not found). The appearance of this page is controlled with the ErrorDocument directive and can be customized in a flexible manner as discussed in the Custom error responses and International Server Error Responses documents.
Virtual Host examples for common setups
Simple name-based vhosting
Server configuration:
    ...
    Port 80
    ServerName server.domain.tld
    NameVirtualHost *

    <VirtualHost *>
    DocumentRoot /www/domain
    ServerName www.domain.tld
    ...
    </VirtualHost>

    <VirtualHost *>
    DocumentRoot /www/subdomain
    ServerName www.sub.domain.tld
    ...
    </VirtualHost>
The asterisks match all addresses, so the main server serves no requests. Due to the fact that www.domain.tld is first in the configuration file, it has the highest priority and can be seen as the default or primary server.
More complicated name-based vhosts
Server configuration:
    ...
    Port 80
    ServerName server.domain.tld
    NameVirtualHost 111.22.33.44

    <VirtualHost 111.22.33.44>
    DocumentRoot /www/domain
    ServerName www.domain.tld
    ...
    </VirtualHost>

    <VirtualHost 111.22.33.44>
    DocumentRoot /www/subdomain
    ServerName www.sub.domain.tld
    ...
    </VirtualHost>
Apart from localhost there are no unspecified addresses/ports, therefore the main server only serves localhost requests. Due to the fact that www.domain.tld has the highest priority it can be seen as the default or primary server.
Server configuration:
    ...
    Port 80
    ServerName www.domain.tld
    DocumentRoot /www/domain

    NameVirtualHost 111.22.33.55

    <VirtualHost 111.22.33.55>
    DocumentRoot /www/otherdomain
    ServerName www.otherdomain.tld
    ...
    </VirtualHost>

    <VirtualHost 111.22.33.55>
    DocumentRoot /www/subdomain
    ServerName www.sub.domain.tld
    ServerAlias *.sub.domain.tld
    ...
    </VirtualHost>
Any request to an address other than 111.22.33.55 will be served from the main server. A request to 111.22.33.55 with an unknown or no Host: header will be served from www.otherdomain.tld. The server can be made to respond to internal and external requests with the same content, with just one VirtualHost section.
Server configuration:
    ...
    NameVirtualHost 192.168.1.1
    NameVirtualHost 111.22.33.55

    <VirtualHost 192.168.1.1 111.22.33.55>
    DocumentRoot /www/server1
    ServerName server1.domain.tld
    ServerAlias server1
    ...
    </VirtualHost>
Now requests from both networks will be served from the same
VirtualHost Server configuration:
    ...
    NameVirtualHost 111.22.33.44:80
    NameVirtualHost 111.22.33.44:8080

    <VirtualHost 111.22.33.44:80>
    ServerName www.domain.tld
    DocumentRoot /www/domain-80
    </VirtualHost>

    <VirtualHost 111.22.33.44:8080>
    ServerName www.domain.tld
    DocumentRoot /www/domain-8080
    </VirtualHost>

    <VirtualHost 111.22.33.44:80>
    ServerName www.otherdomain.tld
    DocumentRoot /www/otherdomain-80
    </VirtualHost>

    <VirtualHost 111.22.33.44:8080>
    ServerName www.otherdomain.tld
    DocumentRoot /www/otherdomain-8080
    </VirtualHost>
IP-based vhosts
Server configuration:
    ...
    Port 80
    DocumentRoot /www/domain
    ServerName www.domain.tld

    <VirtualHost 111.22.33.55>
    DocumentRoot /www/otherdomain
    ServerName www.otherdomain.tld
    ...
    </VirtualHost>
www.otherdomain.tldcan only be reached through the address 111.22.33.55, while www.domain.tld can only be reached through 111.22.33.44 (which represents our main server).
Server configuration:
    ...
    Port 80
    ServerName server.domain.tld

    <VirtualHost 111.22.33.44>
    DocumentRoot /www/domain
    ServerName www.domain.tld
    ...
    </VirtualHost>

    <VirtualHost 111.22.33.55>
    DocumentRoot /www/otherdomain
    ServerName www.otherdomain.tld
    ...
    </VirtualHost>
The main server can never catch a request, because all IP addresses of our machine are in use for IP-based virtual hosts (only localhost requests can hit the main server).
Server configuration:
    ...
    Port 80
    Listen 111.22.33.44:80
    Listen 111.22.33.55:8080
    ServerName server.domain.tld

    <VirtualHost 111.22.33.44:80>
    DocumentRoot /www/domain
    ServerName www.domain.tld
    ...
    </VirtualHost>

    <VirtualHost 111.22.33.55:8080>
    ServerName www-cache.domain.tld
    ...
      <Directory proxy:>
      Order Deny,Allow
      Deny from all
      Allow from 111.22.33
      </Directory>
    </VirtualHost>
The main server can never catch a request, because all IP addresses (apart from localhost) of our machine are in use for IP-based virtual hosts. The web server can only be reached on the first address through port 80 and the proxy only on the second address through port 8080.
Mixed name-/IP-based vhosts
Server configuration:
    ...
    Port 80
    ServerName server.domain.tld

    NameVirtualHost 111.22.33.44

    <VirtualHost 111.22.33.44>
    DocumentRoot /www/domain
    ServerName www.domain.tld
    ...
    </VirtualHost>

    <VirtualHost 111.22.33.44>
    DocumentRoot /www/subdomain1
    ServerName www.sub1.domain.tld
    ...
    </VirtualHost>

    <VirtualHost 111.22.33.44>
    DocumentRoot /www/subdomain2
    ServerName www.sub2.domain.tld
    ...
    </VirtualHost>

    <VirtualHost 111.22.33.55>
    DocumentRoot /www/otherdomain1
    ServerName www.otherdomain1.tld
    ...
    </VirtualHost>

    <VirtualHost 111.22.33.66>
    DocumentRoot /www/otherdomain2
    ServerName www.otherdomain2.tld
    ...
    </VirtualHost>
Port-based vhosts
Server configuration:
    ...
    Listen 80
    Listen 8080
    ServerName www.domain.tld
    DocumentRoot /www/domain

    <VirtualHost 111.22.33.44:8080>
    DocumentRoot /www/domain2
    ...
    </VirtualHost>
A request to www.domain.tld on port 80 is served from the main server and a request to port 8080 is served from the virtual host.
Using _default_ vhosts
Server configuration:
    ...
    <VirtualHost _default_:*>
    DocumentRoot /www/default
    ...
    </VirtualHost>
Using such a default vhost with a wildcard port effectively prevents any request going to the main server.
A default vhost never serves a request that was sent to an address/port that is used for name-based vhosts. If the request contained an unknown or noHost:header it is always served from the primary name-based vhost (the vhost for that address/port appearing first in the configuration file).
You can useAliasMatchorRewriteRuleto rewrite any request to a single information page (or script).
_default_ vhost for port 80. Server configuration:
    ...
    <VirtualHost _default_:80>
    DocumentRoot /www/default80
    ...
    </VirtualHost>

    <VirtualHost _default_:*>
    DocumentRoot /www/default
    ...
    </VirtualHost>
The default vhost for port 80 (which must appear before any default vhost with a wildcard port) catches all requests that were sent to an unspecified IP address. The main server is never used to serve a request.
Server configuration:
    ...
    <VirtualHost _default_:80>
    DocumentRoot /www/default
    ...
    </VirtualHost>
A request to an unspecified address on port 80 is served from the default vhost any other request to an unspecified address and port is served from the main server.
Migrating a name-based vhost to an IP-based vhost
VirtualHost directive. Server configuration:
    ...
    Port 80
    ServerName www.domain.tld
    DocumentRoot /www/domain

    NameVirtualHost 111.22.33.55

    <VirtualHost 111.22.33.55 111.22.33.66>
    DocumentRoot /www/otherdomain
    ServerName www.otherdomain.tld
    ...
    </VirtualHost>

    <VirtualHost 111.22.33.55>
    DocumentRoot /www/subdomain
    ServerName www.sub.domain.tld
    ServerAlias *.sub.domain.tld
    ...
    </VirtualHost>
The vhost can now be accessed through the new address (as an IP-based vhost) and through the old address (as a name-based vhost).
Using the ServerPath directive
Host: header. Old HTTP/1.0 clients do not send such a header and Apache has no clue what vhost the client tried to reach (and serves the request from the primary vhost). To provide as much backward compatibility as possible we create a primary vhost which returns a single page containing links with an URL prefix to the name-based virtual hosts. Server configuration:
    ...
    NameVirtualHost 111.22.33.44
    <VirtualHost 111.22.33.44>
    # primary vhost
    DocumentRoot /www/subdomain
    RewriteEngine On
    RewriteRule ^/.* /www/subdomain/index.html
    </VirtualHost>

    <VirtualHost 111.22.33.44>
    DocumentRoot /www/subdomain/sub1
    ServerName www.sub1.domain.tld
    ServerPath /sub1/
    RewriteEngine On
    RewriteRule ^(/sub1/.*) /www/subdomain$1
    </VirtualHost>

    <VirtualHost 111.22.33.44>
    DocumentRoot /www/subdomain/sub2
    ServerName www.sub2.domain.tld
    ServerPath /sub2/
    RewriteEngine On
    RewriteRule ^(/sub2/.*) /www/subdomain$1
    ...
    </VirtualHost>
Due to theServerPathdirective a request to the URL http://www.sub1.domain.tld/sub1/ is always served from the sub1-vhost.
A request to the URL http://www.sub1.domain.tld/ is only served from the sub1-vhost if the client sent a correctHost:header. If noHost:header is sent the client gets the information page from the primary host.
Please note that there is one oddity: A request to http://www.sub2.domain.tld/sub1/ is also served from the sub1-vhost if the client sent noHost:header.
TheRewriteRuledirectives are used to make sure that a client which sent a correctHost:header can use both URL variants, i.e., with or without URL prefix.
Creating a New Web Site
IIS 4.0 makes it easy to create new Web sites, and to assign them to the desired IP address and TCP and SSL ports. New to IIS 4.0 is the ability to assign Host Header Names for each site that enables you to run multiple distinct sites on a single IP address.
To create a new Web Site using the MMC-based ISM, follow these steps:
 Web Site. The New Web Site Wizard prompts you to enter the description for the new Web site. This is the description that identifies it in the scope pane of ISM. Advanced to set the Host Header Name). By default, the All Unassigned value is selected for the IP Address, and Port 80 is selected for the TCP Port, and your new Web site is set up to replace the Default Web Site. Accept these values if you want to replace the Default Web Site with this new Web site, or change them if you have a unique IP Address or TCP Port to which this Web site should be assigned. Setting the TCP port to something other than 80 requires your clients to add the port to the end of the URL (e.g. www.mythical.org:81). Setting a unique IP Address for your Web site requires you to add the IP address to the network adapter, and to add a DNS host address record and needed CNAME records.
Select the access permissions needed for the new Web site Home Directory, and click Finish to complete the New Web Site Wizard.
|
Note: Either the TCP Port or IP Address must be unique in order for the new Web site to be automatically started. If the settings conflict with another Web site, the new Web site will be displayed as stopped in the scope pane, and will not be able to be started using the Start menu option. A new Web site created by accepting the default IP Address and TCP Port will always be stopped after creation (as the default values are identical to those of the Default Web Site). For a Web site to be able to start, the port number, IP address, or Host Header Name must be unique. |
Configuring Web Site-Specific Properties
The site-specific properties for a Web site are largely the same as those described in the Master properties sections, however, they only affect a specific Web site. There are a few differences however, in that the properties that were inaccessible (grayed out) in the Master Web Service properties dialog boxes, are configurable in the site-specific dialog boxes.
Identifying the Web Site
The Web Site property sheet enables you to specify a Web site description, and to configure the IP Address and TCP Port for a specific Web site. If SSL is enabled, the SSL port can also be configured. The IP Address, TCP, and SSL values cannot be assigned in the Master Properties for the WWW Service, only in specific sites.
When a description is provided (in the Web Site Identification section), it is displayed as the node name in the ISM scope pane. When no description is provided, IIS may use the Host Header Name (if available), or it uses [Web Site #x] (where x is the number of the Web site).
The Advanced button next to the IP Address dialog box enables you to configure multiple IP Address, TCP Ports, and Host Header Names for the Web site (so that it hosts multiple distinct Web sites). To configure multiple sites, click the Advanced button, and the Advanced Multiple Web Site Configuration dialog box appears.
This dialog box enables you to assign multiple identities for the Web Site, as well as assign multiple SSL identities and SSL Ports. To assign an additional identity for the Web site, click Add, and enter the IP Address, TCP Port, and Host Header Name into the Advanced Web Site Identification dialog box
Identical Property Sheets
The Operators, Documents, Directory Security, HTTP Headers, and Custom Errors property sheets are identical to the Master Properties sheets for the WWW Service, although configuration values set here only apply to the selected Web site (as well as virtual directories, directories, and files below it).
Tuning Performance
The Performance property sheet is similar to the Master Performance property sheet, but the Enable Bandwidth Throttling option is enabled (whereas it is grayed out in the Performance property sheet in the WWW Service Master Properties), and the tuning options only apply to the selected Web site.
To use the bandwidth throttling option, click the checkbox next to Enable Bandwidth Throttling and enter the bandwidth limit (in Kbps) for the selected Web site.
Setting ISAPI filters
The ISAPI property sheet is identical to the ISAPI property sheet in the WWW Service Master Properties, however no default filters will be listed, and adding filters here only applies to the selected Web site.
Configuring the Home Directory
The Home Directory property sheet enables you to specify the content source. Home Directory settings configured here only apply to the selected Web site. The Application Configuration dialog box (accessible via the Configuration button) is the same, with the exception that it does not include Process Options property sheet.
The content source is selectable in the site-specific Home Directory property sheet, and is controlled by selecting the radio button next to one of the three options provided. The content can come from a directory located on this computer, a share located on another computer, or a redirection to a URL. The source of the content will determine what happens next:
A directory below this one enables you to redirect the URL to a child directory below the parent directory. A permanent redirection for this resource option redirects the client browser using an HTTP 301 Permanent Redirect message.
The Redirect To text box can also be used to pass additional redirect variables that pass along sections of the original URL. Each redirect variable passes a specific section of the URL, as described below:
|
$S |
matched suffix |
|
|
$P |
parameters |
|
|
$Q |
question mark & parameters |
|
|
$V |
URL without server name |
|
|
$0–$9 |
matching section to wildcard |
|
|
! |
do not redirect |
Using IIS to Host Multiple Web Sites
IIS provides the means to host multiple Web sites by distinguishing between the assigned IP Addresses, TCP ports, and Host Header Names. IIS 4.0 requires that a unique combination of these three values be assigned to each operating Web site:
Creating Multiple Web Sites
To create multiple sites, run the New Web Site Wizard for each site and assign the description, home directory, specific IP address, and TCP port for each new site. If you’re going to use Host Header Names to manage multiple sites, you’ll need to go to the Advanced Multiple Web Site Configuration dialog box after running the New Web Site Wizard to enter the needed Host Header Name.
Whether your running multiple Web sites using different IP addresses or different Host Header Names, in either case you’ll need to configure your name resolution system (DNS or WINS) to resolve the IP address or Host Header Name to the specific Web site. If you’re running multiple Web sites using distinct TCP ports, the clients will have to append the TCP port to the end of the URL in order to reach the Web site.
Hosting Multiple Web Sites Using SSL
As described above, each of the multiple sites in IIS 4.0 must have a unique IP address, TCP port, or Host Header Name in order to work. Similarly, when you are hosting multiple sites that are using SSL, in addition to having a unique IP address or TCP port, the site using SSL must be assigned a unique SSL port.
One important difference between sites that do and do not use SSL is that the use of Host Header Names is not supported on sites using SSL to secure connections.
Creating FTP Sites
To create a new FTP site using the MMC-based ISM, follow these steps:
FTP Site. This invokes the New FTP Site Wizard, which prompts you to provide the description for the new FTP site. |
Note: If the new FTP site settings conflict with an existing FTP site, the new FTP site is displayed as (stopped) in the scope pane. The new FTP site will not be able to be started using the Start menu option until either its TCP Port or IP Address is unique. The default wizard values will always be the same as the Default FTP Site (All Unassigned IP Addresses, and TCP port 21), thus new FTP sites using these values will always be stopped. |
Configuring FTP Site-specific Properties
Configuring the site-specific FTP properties is fundamentally the same as configuring Master FTP Service properties, with the difference that the settings will only affect a specific FTP site. There are small differences between the FTP Service and site-specific FTP properties. Properties that were grayed out in the FTP Service Master Properties dialog boxes are configurable in the site-specific dialog boxes.
Configuring an FTP Site
While the FTP Site property sheet is highly similar to the FTP Service Master Properties, the FTP Site property sheet enables you to configure the IP Address and TCP Port for a specific FTP site. You can Enable Logging and configure the logging format to be used. The FTP Site property sheet also provides an available Current Sessions button that invokes the FTP User Sessions dialog box. This dialog box enables you to view the connected users, and to disconnect a single or all users, from the FTP site.
Establishing FTP Security Accounts
The Security Accounts property sheet enables you to configure how users connect to the FTP site. The Security Accounts property sheet is identical to the Security Accounts property sheet for the FTP Service Master Properties, but the account information entered here only applies to the selected FTP site.
Creating FTP Messages
The Messages property sheet is identical to the Message property sheet for the FTP Service Master Properties, but the FTP site messages here only apply to the selected FTP site.
Assigning an FTP Home Directory
An FTP site Home Directory property sheet is similar to the FTP Service Home Directory property sheet; it differs, though, by enabling you to specify the FTP site content source. These settings only apply to the selected FTP site.
Selecting the radio button next to one of the options provided controls the content source. The content can come from a directory located on this computer, or a share located on another computer.
The source determines what happens next:
The Home Directory property sheet also enables you to set the Directory Listing Style to either UNIX style or MS-DOS style (default).
Setting Directory Security
The Directory Security dialog box is used to grant or deny access based on IP Address, range of IP Addresses, or Domain Name. The Directory Security property sheet is identical to the Directory Security property sheet in the Master FTP Service Properties, yet access granted or denied here only applies to the selected FTP site.
Setting Up ftpd
The FTP daemon, ftpd, must be started on the FTP server (some Linux versions use the daemon wu.ftpd as the server). The daemon is usually handled by inetd instead of the rc startup files, so ftpd is only active when someone needs it. This approach is best for all but the most heavily laden FTP sites. When ftpd is started using inetd, the inetd daemon watches the TCP command port (channel 21) for an arriving data packet requesting a connection, and then spawns ftpd.
Make sure that inetd can start the ftpd daemon by checking the inetd configuration file (usually /etc/inetd.config) for a line that looks like the following:
ftp stream tcp nowait root /usr/etc/ftpd ftpd -l
If the line doesn't exist, add it to the file. With most Linux systems, the line is already in the file although it may be commented out. Remove the comment symbol if this is the case. The FTP entry essentially specifies to inetd that FTP is to use TCP and that it should spawn ftpd every time a new connection is made to the FTP port. In the preceding example, the ftpd daemon is started with the -l option, which enables logging. You can ignore this option if you want.
There are several ftpd daemon options that you can add to the /etc/inetd.config line to control ftpd's behavior. The most commonly used options are as follows:
|
-d |
This option adds debugging information to the syslog. |
|
-l |
This option activates logging of sessions (only failed and successful logins, not debug information). If the -l option is specified twice, all commands are logged, too. If specified three times, the size of all get and put file transfers are added, as well. |
|
-t |
This option sets the timeout period before ftpd terminates after a session is concluded (default is 15 minutes). The value is specified in seconds after the -t option. |
|
-T |
This option sets the maximum timeout period (in seconds) that a client can request. The default is two hours. This enables a client to alter the normal default timeout for some reason. |
|
-u |
This option sets the umask value for files uploaded to the local system. The default umask is 022. Clients can request a different umask value. |
FTP Logins
If you are going to set up a user-based FTP service, where each person accessing your system has a valid login name and password, then you must create an account for each user in the /etc/passwd file. If you are not allowing anonymous FTP access, do not create a generic login that anyone can use.
To set up an anonymous FTP server, you must create a login for the anonymous user ID. This is done in the normal process of adding a user to the /etc/passwd file. The login name is whatever you want people to use when they access your system, such as "anonymous" or "ftp". You need to select a login directory for the anonymous users that can be protected from the rest of the filesystem. A typical /etc/passwd entry looks like the following:
ftp:*:400:51:Anonymous FTP access:/usr/ftp:/bin/false
This entry sets up the anonymous user with a login of ftp. The asterisk password prevents anyone gaining access to the account. The user ID number (400) is, of course, unique to the entire system. For better security, it is a good idea to create a separate group just for the anonymous FTP access (edit the /etc/group file to add a new group), then set the ftp user to that group. Only the anonymous FTP use should belong to that group, as it can be used to set file permissions to restrict access and make your system more secure. The login directory in the example above is /usr/ftp, although you could choose any directory as long as it belongs to the anonymous FTP user (for security reasons, again). The startup program shown in the preceding example is /bin/false, which helps protect your system from access to accounts and utilities that do not have a strong password protection.
Setting Up the Directories
As you will see in the next section, "Setting Permissions," you can try to make the entire anonymous FTP subdirectory structure a filesystem unto itself, with no allowance for the anonymous user to get anywhere other than /usr/ftp (or whatever directory you use for anonymous access). For this reason, you need to create a mini-filesystem just for the anonymous FTP access, which holds the usual directory names and basic files anyone logging in needs. Part of the procedure is summarized in a checklist at the end of this chapter.
The process for setting up the directories your anonymous FTP login needs is simple, requiring you to create a number of directories and copy files into them. Here are the basic procedures:
The copies of the /etc/passwd and /etc/group files are copied into the ~ftp/etc directory to bypass the actual files in /etc. Edit these files to remove all passwords and replace them with an asterisk, preventing access to those accounts through anonymous FTP. Remove all entries in both /etc/passwd and /etc/group that are used names or groups (in other words, used by a valid user or group on your system), as well as most other entries except those used by the anonymous FTP login (usually just anonymous and bin).
You can use the ~ftp/pub directory structure to store the files you want to allow anonymous users to access. Copy them into this directory. You can create subdirectories as you need them for organizational purposes. It may be useful to create an upload directory somewhere in the ~ftp/pub directory structure that has write permission, so that users can upload files to you only into this upload area.
Setting Permissions
You can use the chroot command to help protect your system. The chroot command makes the root directory appear to be something other than / on a filesystem. For example, when chroot has been set for the anonymous FTP login, any time the anonymous user types a cd command, it can always be relative to their home directory. In other words, when they type cd /bin, they will really be changing to /usr/ftp/bin if the root has been set to /usr/ftp. This helps prevent access to any other areas of the filesystem than the FTP directory structure. The changes are effective only for the user ID the chroot command was run for.
If you do create an upload area, you may want to set the permissions to allow execute and write, but not read (to prevent another user downloading the files someone else has uploaded).
To set the permissions for files and directories used by your anonymous FTP users, follow the following procedure. If the directories or files do not already exist, copy or create them as necessary:
In general, you should have your FTP directories set so that all permissions for directories under ~ftp prevent write access by user, group, and other. Make sure the directories and files under ~ftp are set to allow the anonymous login to read them. (The directories need execute permission to allow the anonymous users to enter them and obtain directory listings.) This set of permissions provides pretty good security.
You can set the ownership of files and directories with the chown command. This command
chown root ~ftp/dev
sets the owner of ~ftp/dev to root, for example. All directories in the ~ftp directory structure should have the permissions set with the chmod command. This command
chmod 555 dir_name
sets read-execute permission only for the directory, for example. The exception to this rule is the upload directory, which can have write permission, as noted earlier.